For Use with Windows
After about a month using Stata, most early programmers start asking questions about how to expand Stata's functionalities beyond generate and replace. A common workplace question is: "how can I get Stata to send out automatic emails for me?"
A quick Google search yields many answers – most of which requires you to know a thing or two about email servers. After hours of collecting material and trying to send out emails, you'll realize that your work's firewall disallows you to do anything of the sort! Well, if you use Outlook (which is pretty common), you can easily automate sending emails using the following VBScript:
Set Outlook = CreateObject("Outlook.Application")
Set Mail = Outlook.CreateItem(0)
Mail.To = "email@somedomain.com"
Mail.Subject = "Automated Email"
Mail.Body = "Hello Recipient"
Mail.Send
Set Mail = Nothing
Set Outlook = Nothing
But how do we send this out? It's really quite simple. Open up any text editor (though I recommend using Notepad++), copy this code into the text editor, and save this file as "whatever.vbs", and either double click the file or run it by using Stata's shell command. yourdirectory + "whatever.vbs" CRLF
This is great for simple emails, but what if we want to make our body a little more complex and less "robotic?" Let me (re)introduce you to ASCII characters 10 and 13. Since we're dealing with Windows for this post, let's switch them around and show char(13)+char(10) which corresponds to \r\n or translated: carriage return + line feed (CRLF). What the heck is a carriage you say? (Likely if you're under 50) Well, it all relates back to typewriters.
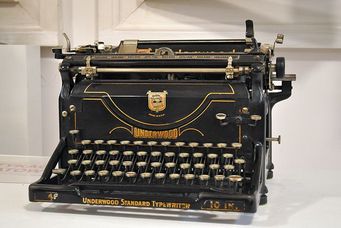
The carriage is the tray thing that moves along as you type, and by asking it to "return", you usually will get it shooting back with that distinctive PING sound. Line feed tells the typewriter to move the paper up one line. A carriage return without a line feed would overwrite anything you've typed, and a line feed without a carriage return could start a newline in the middle of a page. Of course, things don't work that way anymore, but hopefully that makes a little more sense!
Anyway, this combination is useful to you if you want to send multiple paragraphs in an email. Even more useful, write out your email body in a text file and let Stata pick up the file for you, and write the body by itself. But more on that in a little bit. For now, let’s talk about writing the actual script. In Stata, in order to write a script, we must first familiarize ourselves with the file processing commands: file open, file write, and file close. The secret here is that we can use locals to fill out any missing information in the file such as an email recipient, a subject line, or an attachment location. Boom! We have a program.
program define outlook_email
        syntax , to(string) [subject(string) body(string) attachment(string)]
end
Since we always need a recipient for an email "to" is a must, but everything else should remain optional. We want to allow our users to do whatever they want, which might include sending out 10,000 blank emails to a specific person. Why? They probably have their reasons. File Processing
Want to write a file using Stata? It's very easy to write the VBScript which runs the entire process. For those who are unfamiliar with the file command, it follows three basic steps: open that file (even if it doesn't exist yet), write stuff to that file, and close that file! Let's take a look at some basic syntax below:
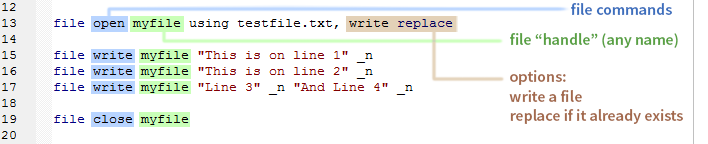
The blue denotes these steps, the green is the name that we gave our program to point to which file to write to, and the red denotes the options. Notice that our green "name" is myfile, but it could be anything, yet our physical file name is "testfile.txt". Think of myfile as an id for which file we're writing to (or reading from).
Notice that we just need to put a string followed by _n to write a single line to the file. We then do that again for line two, and for lines three and four. We're able to write lines three and four on the same line, because they contain that _n which calls for an end of line character (in this case CRLF) to be written. The Body
There are four steps to a making a text file work with VBS:
You’ll see that we use filefilter to take care of these four scenarios, creating a single string that contains the entire body of our email (line breaks included). Putting all of this together, we arrive at the final code:
Final Program
********************************************************************************
* Will Matsuoka: 2015-12-17 version 2.0.0 - for demonstrative purposes
********************************************************************************

program define outlook_email
        syntax , to(string) [subject(string) body(string) attachment(string)]

* Allow for the subject to contain quotes and apostrophes
        if `"`subject'"' != "" {
                sta_2_vbs `"`subject'"'
                local subject = r(vbstring)
        }

        if `"`body'"' != "" {
                preserve
                tempfile f1 f2
                filefilter "`body'" `f1', from(`"""') to(`""+Chr(34)+""')
                filefilter `f1' `f2', from(`"'"') to(`""+Chr(39)+""')
                filefilter `f2' `f1', from(\013d\010d) to(`""+Chr(13)+Chr(10)+""') replace
                filefilter `f1' `f2', from(`"+""+"') to("+") replace

                clear
                set obs 1
                gen file = fileread("`f2'")
                local body = file[1]
                restore
        }

        tempname myfile
        file open `myfile' using sendemail.vbs, write replace
        file write `myfile' ///
                `"Set Outlook = CreateObject("Outlook.Application")"' _n ///
                `"Set Mail = Outlook.CreateItem(0)"' _n ///
                `"Mail.To = "`to'""' _n ///
                `"Mail.Subject = "`subject'""' _n ///
                `"Mail.Body = "`body'""' _n
        if "`attachment'" != "" {
                file write `myfile' `"Mail.Attachments.Add("`attachment'")"' _n
        }
        file write `myfile' ///
                `"Mail.Send"' _n ///
                `"Set Mail = Nothing"' _n ///
                `"Set Outlook = Nothing"' _n
        file close `myfile'

        shell sendemail.vbs
end

program define sta_2_vbs, rclass
        local string = subinstr(`"`1'"', `"""', `""+Chr(34)+""', .)
        local string = subinstr(`"`string'"', `"'"', `""+Chr(39)+""', .)
        local string = subinstr(`"`string'"', `"+""+"', "+", .)
        return local vbstring `"`string'"'
end
Not too terrible, although I do have a few things to note:
6 Comments
I was extremely lucky to receive an advanced copy of gcmap written by the folks over at www.belenchavez.com. You see, gcmap is an excellent program that uses Google Charts API to create professional web quality charts using your Stata datasets. Don’t believe me? Check out this example below.
Every NFL team, every NFL stadium, with pictures! This dataset was created by using information from Wikipedia. I’ve taken my fair share of stuff from Wikipedia, but I’ve also donated every year to the Wikimedia foundation, and you should too!
Today is December 13, 2015 – which also marks Taylor Swift’s 26th birthday. Happy Birthday, Taylor! In an extension to NFL stadiums, I’ve merged data from all the North American locations Taylor Swift played at in her 1989 World Tour. Here’s another example of how you can use gcmap in order to produce some great (although somewhat creepy) maps.
Enjoy - I hope we see a lot more Stata + Google Charts in the months to come!
Next up: NFL Injuries – an Artistic Approach
"Perhaps you've noticed the new Microsoft Office formats" is something you'd say back in 2007. Nevertheless, I'd bet that a good portion of people haven't looked into what that new "x" is at the end of all default files (.docx, .xlsx, .pptx) and an equal number of people probably don't care. However, I'd like to try and convince these doubters just how great this is! This "x" stands for XML (extensible markup language) and makes the file formats seem hipper than their x-less counterparts. Rather than documents and spreadsheets being stored as binary files, which are difficult to read, all information is stored in easily read zipped-xml files. That's right - all .abcx files are just zip files.
Let's look at an example Excel file (Ex-Book.xlsx):
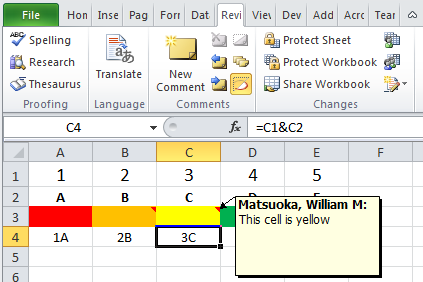
It has a little bit of everything: values, text, color formats, comments, and formulas. If we wish to look at how the data are stored, we can easily change the extension of the file from .xlsx to .zip.
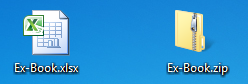
Naturally, we already have a way to take care of zip files in Stata with the command unzipfile. So from this point on, we're going to navigate this file strictly using Stata. My Excel workbook is located on my desktop, so let's unzip it.
cap mkdir unzipbook cd unzipbook unzipfile ../Ex-Book.xlsx, replace dir xl/ 
Note that we didn't have to change the extension, and we now have a list of files and directories under the "xl" folder. Files and properties of interest:
These are good reference files, but our main interest is located within the "worksheets" directory under our "xl" folder. Here, we can find each sheet named sheet1, sheet2, sheet3, etc. The sheets are indexed according to the workbook.xml files (ex: "rId1" corresponds to sheet1). I've always had trouble getting formulas out of Excel. Instead of resorting to VBA, we can now use Stata to catalog this information (I've found this very useful for auditing purpose). Here's a snippet of our worksheets/sheet1.xml file: 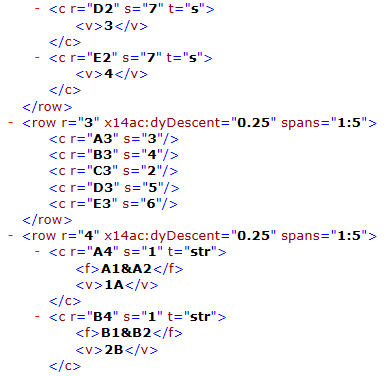
Interpreting this section, we can see that it contains rows 2-4 which corresponds to our strings (A, B, C), our styles (Red, Orange, Yellow), and our formulas. Going from top to bottom, by deduction we can see that our first <c> or cell class contains a value of 3 and references cell D2 with the style of 7. Here, since the type is a string ("s"), we need to reference our sharedStrings.xml file to see what the fourth string is. We look for the fourth string, since the count initializes at zero rather than looking at the third string. Our fourth observation is a "D" and our fifth observation is an "E" in the shareStrings.xml file.
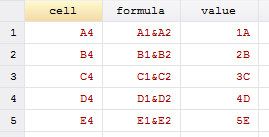
The third row contains our colored cells without any data. Therefore, they have no values, but contain styles corresponding to the fill colors. A quick note: the order here goes (3, 4, 2, 5, 6) because I accidentally chose yellow first. Finally, the most valuable part of this exercise (for me at least) are the formulas. Cell A4 contains the formula "=A1&A2" and displays the evaluated value of the formula. When linking to other workbooks, the workbook path will likely be another reference such as [1], [2], [3], etc. A quick use of some nice Stata commands below yields a simple code for creating an index of your workbook's information.
tempfile f1 f2
filefilter xl/worksheets/sheet1.xml `f1', from("<c") to("\r\n<c")
filefilter `f1' `f2', from("</c>") to("</c>\r\n")
import delimited `f2', delimit("@@@", asstring) clear
keep if regexm(v1, "([^<>]+)")
gen value = regexs(1) if regexm(v1, "v>([^<>]+)")
replace formula = subinstr(formula, "&", "&", .)
keep cell formula value
Thanks to that little x, we are able to easily obtain meta-information about our Excel files, presentations, or even Word documents. Think about having to look through thousands of documents to find a specific comment or reference - seems like a simple loop would suffice. Maybe that x is pretty cool after all.
|
AuthorWill Matsuoka is the creator of W=M/Stata - he likes creativity and simplicity, taking pictures of food, competition, and anything that can be analyzed. Archives
July 2016
Categories
All
|
||
 RSS Feed