OAuthWhy Care Block:
Oh man, things are about to get real juicy – this is the final reveal of the Twitter API and I couldn’t think of a better time to do this. After all, we’ve made a complete mess out of Stata with our unruly bitwise operators, unending computer security algorithms, and un-um… unfortunate time-based C-plugins. Well, my Stata friends, this is how to do anything with Stata and the Twitter API.
Let’s post! Seriously, let’s tweet about things using Stata. This method can be used not only to tweet, but also to send direct messages, retweet things, and like (favorite) others’ tweets. If you’re like me, you don’t really use Twitter that well and I’m sure my 40 followers (I rounded up) would agree. But wouldn’t it be great to find a way to reach thousands of Twitter followers based off of hashtags or messages or even emoji? If the answer is no, fine, that’s my best attempt at convincing you but still feel free to read on. Let’s bring together everything we need to send a Tweet out on the internet:
Base64 Encoding
Easy way to turn readable stuff into unreadable stuff for humans but it’s not so bad for computers. This takes all alphanumeric characters plus the plus and the “/” (which equals 64 characters to choose from), converts 8-bit chunks into 6-bit chunks which end up receiving the specific character. Sometimes equal signs are added, but you already know that.
See post on Base64 Encoding Bitwise Operators and Security Methods
We’ve got bits dressed to the nines: shifting operators, rotating operators, logical operators, overflow methods, and all kinds of methods to translate from base 2 to base 16 to base 10.
These feed into our HMAC-SHA1 algorithm, which was awful to develop… this seriously has to go in the “lots of effort, little reward” category. See post on Bitwise Operators and HMAC-SHA1 Stata Plugins
We needed time - I mean we all do – in seconds since 1970 based off of Greenwich Time. We could have just accounted for our respective time zones (unless you’re located in GMT+0 of course), but why not use this as a great learning opportunity?
See post on Plugins Nonce
Once? None? Scone? What’s a nonce? Simply put, it’s a random 32 character word containing all alphanumeric symbols. Twitter’s example shows this being Base64 encoded, but all it has to be is a random string. vqib2ve89dOnTusESAS26Ceu9TcUES2i – see? Easy, just make sure you change the characters each time.
Percent Encoding
What%27s%20percent%20encoding%3F
Based on the UTF-8 URL Encoding standards, we need to replace certain characters that would otherwise cause complications in a URL. Don’t worry though, we’ve got a function for that. Just know that valid URL characters are all letters and numbers as well as the dash, the period, the underscore, and the tilde.
Send Out the Tweets
Twitter has some fabulous documentation for their API so it’s fairly easy to find the method that you want to do. These processes can be generalized and used across many of these methods so we are by no means limited to just tweeting. For tweets (hereon referred to as status updates to be consistent with Twitter’s documentation), we use the base or “resource” URL:
https://api.twitter.com/1.1/statuses/update.json Remember, status updates can only be 140 characters and Twitter will actually shorten URLs for you, but still keep in mind your character limits! All statuses must be percent encoded, so let’s go ahead and create our status local; we’ll also store our base URL while we’re at it.
local b_url "https://api.twitter.com/1.1/statuses/update.json"
local status = "Sent out this tweet using #Stata and the #Twitter #API – http://www.wmatsuoka.com/stata/stata-and-the-twitter-api-part-ii tells you how!"
mata: st_local("status", percentencode("`status'"))
We then take all of our application information: consumer key, consumer secret, access token, and access secret and store these as locals as well. local cons_key "ZAPp9dO37PnzCofN2Nm8n8kye" local cons_sec "kfbtARFpBIdb515iaS48kYZjWhLoIdbEiAINDVX0c3W3e0fgWe" local accs_key "1234567890-YFklDWGuvSIGLYPMnAfOZgLgLsMXjKIHqaIr1F5" local accs_sec "LYvHWfTS6LXjtDPVXchs6dXUG52l41j4HmicYwjr8aStw" For this section, we will be creating all of our necessary authentication variables. The first step to creating our secret signing key is to make a string that contains our consumer secret key, concatenated with an ampersand, concatenated with our access secret key. We’ll also include all the necessary locals we talked about earlier.
local s_key    = "`cons_sec'&`accs_sec'"
mata: st_local("nonce", gen_nonce_32())
local sig_meth = "HMAC-SHA1"
// If you don't make a plugin, just make sure you do seconds since 1970
// probably using c(current_date) and c(current_time) - [your time zone]
plugin call st_utm
local ts = (clock(substr("`utm_time'", 4, .), "MDhmsY") - clock("1970", "Y"))/1000
Now it’s time to create our signature. We start by percent encoding our base URL. For our signature string, we include the following categories:
local sig = "oauth_consumer_key=`cons_key'&oauth_nonce=`nonce'&oauth_signature_method=`sig_meth'&oauth_timestamp=`ts'&oauth_token=`accs_tok'&oauth_version=1.0&status=`status'" Then, percent encode the signature string and base URL:
mata: st_local("pe", percentencode("`b_url'"))
mata: st_local("pe_sig", percentencode("`sig'"))
This next step is why we spent an ungodly amount of time on bits and hashes! We need to transform our signature string into a Base64 encoding of the HMAC-SHA1 hash result with our message being the percent-encoded signature base hashed with our secret key. Sorry if that's a mouthful, but we can see what that translates to below.
local sig_base = "POST&`pe'&"
mata: x=sha1toascii(hmac_sha1("`s_key'", "`sig_base'`pe_sig'"))
mata: st_local("sig", percentencode(encode64(x)))
Finally, we’re almost done with Twitter and can move on to other more important things! First let’s make sure to post our Tweet because, after all, that's what we're here for. !curl -k --request "POST" "`b_url'" --data "status=`status'" --header "Authorization: OAuth oauth_consumer_key="`cons_key'", oauth_nonce="`nonce'", oauth_signature="`sig'", oauth_signature_method="`sig_meth'", oauth_timestamp="`ts'", oauth_token="`accs_tok'", oauth_version="1.0"" --verbose Now we can marvel at how much time we spent learning about something 99% of us don’t really care about. This is for you, 1% - this is all for you.
PS: Want to add emoji? Go to this site, find the URL Escape Code sections, and add the result to your status string! Ex: %F0%9F%93%88 = Chart with Upward Trend
3 Comments
I thought I’d take a quick break from the latest series on building the Twitter API Library to bring you a message sponsored by Stata Plugins! Okay, we’re not officially sponsored by Stata and, legally speaking, we’re not sponsored by anyone. Technicalities. Maybe someday you’ll wish to plug your brand [here], but even I think that’s highly unlikely – so let’s just get right to plugins.
Do you know C? I wouldn’t say I know it very well, but that sure as hell shouldn’t stop us – this is a great learning opportunity! If you know the language, please feel free to skip to the next paragraph. Still here? Excellent! That means you’re like me and aren’t too concerned with lower level programming languages (that’s code for a language that’s a lot more explicit – it doesn’t look like English anymore). After all, a statement such as: regress price mpg
is much easier to understand than this great (albeit extremely technical) Stata Blog post showing us what’s actually going on behind the scenes so to speak. Now, I actually have some training in Java, but honestly I have to tribute my smooth transition into C to Mata. Mata is a wonderful extension to Stata and I highly recommend picking it up if you haven’t already. It can be difficult to transition to Mata if you simply use Stata and there seems to be a lack of literature pertaining to learning Mata. I’ll point you to UCLA’s code fragment on Mata or Bill Gould’s Mata Matters/Mata the Missing Manual resources if you wish to learn more. The observation is: Mata prepares you for C because it’s extremely similar to the C language and a great transitional language from Stata to C. What’s the point though, right? Well, Mata enables you to be quicker and do complicated things directly from your do-file. Learning C, while sometimes unnecessary if your job is strictly to do quick analysis, will make it so that you can blow your colleagues away by showing them how your new program reduced the return time of a command from .8 to .6 seconds. Sorry again colleagues.
Troubleshooting is difficult and I hope to have a video available soon, but not today. So what’s a practical application for plugins? Directly related to the Twitter API posts, we need Stata to provide us with the time. “That’s dumb” you’d say. Just use - c(current_time) -. Fine, but now we need time in UTC which by the way is combination of the acronyms Coordinate Universal Time (CUT) and the French Temps Universel Coordonné (TUC). So how about:
clock(c(current_time) , "hms") – (TimeOffsetfromGMT)*60*60*1000 Close! But we’re also extremely lazy and want the computer to figure out which time zone we’re in (regardless of whether we have internet connection or not) and it needs to work in batch mode! Okay okay, enough with the requests! Basically, the question is how can we take the computer’s internal UTC time information? That’s where Stata plugins come in handy. At a high level, what we’re going to do is tell Stata: “Hey Stata, go ahead and talk to the computer. Ask it what the current UTC time is and place the result in a local macro that we can call later. Thanks!” Because I have a 64-bit system, it seems that the simple things tend to get a little complicated. I compile the file in Visual Studio (x64) and I also have the 64-bit version of Stata installed. Here’s the main file st_utc.c which should be compiled with the two necessary Stata files stplugin.c and stplugin.h. In other words, it worked for me but unfortunately I give no guarantees that it will work seamlessly on your end. Please edit as necessary. 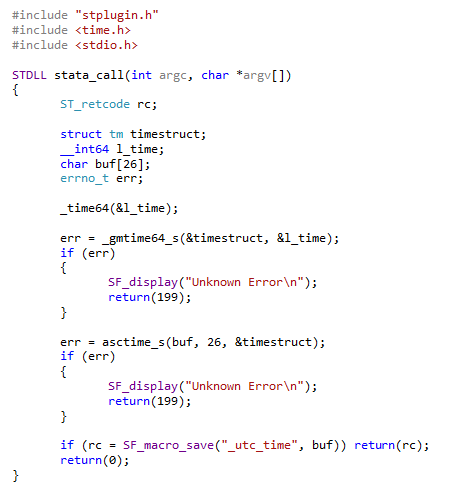
So what’s going on here? Well, the beauty of this file is that we can load whatever libraries we need – here we included the time library so that we can access time variables directly from our stata_call routine. Note how we declare our error handling variable to be of type ST_retcode. We are able to call SF_display which prints the contents of a variable or string to the Stata console and SF_macro_save which allows us to access the contents of the variable buf (our time string) directly from the Stata local `utc_time’ thanks to the stplugin.h header.
After compiling st_utc.dll, you can either rename it st_utc.plugin and place it in your personal ado directory for easy access, or keep it as a dll and specify the location of the file using the option using() as shown below: program st_utc, plugin using(st_utc.dll) plugin call st_utc And it’s that easy! Or so it seems. There are a lot of technical errors that you have to keep in mind from operating systems, to Stata versions (look to older plugin interface versions with older versions of Stata), to whether you really want to spend the time debugging your compiled code. It’s well worth getting it to work at least once! The important take away here is that any Stata user can greatly extend the capabilities of Stata; we haven’t even talked about javacall yet. So the next time a non-Stata user tries to assert their software package dominance by saying: “oh, Stata couldn’t do “x” so I had to use some otheR package”, bet them $20 they’re wrong. Most of the time, they don’t know what they’re talking about and you’ll have $20 to spend on some sweet Stata swag (seriously, we’re not sponsored by Stata). Why Care Block?
I applaud all of you who have made it this far, but unfortunately things are going to get super boring! Well, besides applause I’d also like to take a sentence to thank you for reading this content: whether you’re reading this out of boredom, coercion, to make fun of it, or you just have a general interest, I’d like to extend my gratitude.
Switching back to the good stuff, today we’re talking about hash functions. Think hash browns *delicious* - they’re sliced, diced, and fried to a golden brown; drenched or drizzled with hot sauce or ketchup (I prefer Cholula and Tabasco) and resembles nothing like the raw potato it once was. Now, take your hash browns and try to reconstruct the original potato. “No!” you’d say, “That’s really hard.” Keep in mind this post is about security, from a non-cryptographic scientist or security expert, so anticipate a lot more potato metaphors because that’s about all I know about security. This post is really about making the Twitter API work within Stata without any outside plugins or packages. To do so, we must find a way to recreate the HMAC-SHA1 algorithm which is quite difficult without our previous toolset we designed, so make sure you’ve gone over the bitwise operators. Once we’re on the same page, we can start getting into this hash function in order to send requests using Twitter’s API so that you can retrieve you beautiful, crispy hash brown data in return. The Fuss
HMAC-SHA1 is the type of procedure we’re trying to reproduce from the Wikipedia article available here. I didn’t care much for it. It didn’t explain what it is, what it was really doing, or why we should care at a simple level so that someone less savvy (like me) could understand just what the fuss is all about. Both HMAC and SHA1 are procedures. HMAC stands for Hash Message Authentication Code and is the procedure we use to combine a message with a secret key whereas SHA-1 stands for Security Hash Algorithm 1, which was made by the NSA and is used to break a message into a corresponding hash string with a fixed block size. Together, they make sure that the integrity of the data hasn’t been compromised and that you’re not sending your raw secret message over the internet…series of tubes. The nice thing about the SHA-1 algorithm is that very slight changes, say replacing a single character in the message, dramatically changes the resulting hash so that it’s difficult to crack (though apparently not secure enough for today’s standards). Remember, HMAC is the main procedure to combine a secret key with the message and SHA-1 is just the type of hash function implemented; but you probably don’t care that much and just want to see the code. So let’s get started!
The SHA-1
SHA-1 has a lot of destructive procedures, a lot of breaking bits into smaller bits, and a lot of the previously developed bitwise functions. Let’s see a quick example of this in action.
Say I have the string phrase "The Ore-Ida brand is a syllabic abbreviation of Oregon and Idaho" and I want to run the SHA-1 Function on it.
mata: sha1("The Ore-Ida brand is a syllabic abbreviation of Oregon and Idaho")
The results is (hex): 156a5e19b6301e43794afc5e5aff0584e25bfbe7
In Base64: FWpeGbYwHkN5SvxeWv8FhOJb++c=
Good luck figuring out the original string from the Base64 encoding. Now remember, this is not a post about theory or reasoning behind the SHA-1 procedure; this post is about making it work. Therefore, the advanced Stata user who wishes to replicate/improve this code might find this next section interesting. Here are some of my observations regarding repackaging the SHA-1 function. 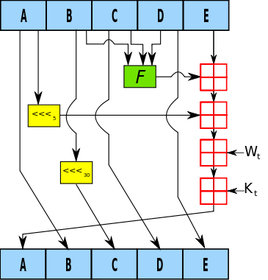
The HMAC
Compared to SHA-1, the HMAC procedure is a walk in the potato fields… it’s easy as potatoes… I’m running out of references here. Did you know that the potato was the first vegetable to be grown in space? If astronauts could do that with potatoes, we can certainly make HMAC-SHA1 work with Stata. There’s really just a three step process at play. The HMAC procedure takes two inputs: a key and a message.
The Conclusion
Well, this post (and the previous one) has been filled with a little more technical jargon than I planned. I like to keep these posts fun and poignant, but this material is for the dedicated and serves as a reference for those who want to expand Stata’s capabilities (even if it takes a little longer than expected). This new Mata function allows Stata to perform the HMAC-SHA1 procedure which is vital for enabling Twitter requests through Stata so that the entire process can be contained within one do-file. Here’s an example of the function in action:
. mata: hmac_sha1("Secret Key", "Message to be sent")
  d5052c13e868ea7c932be9279752e9e67c8195bd
. mata: hmac_sha1("Secret Key", "Message to be Sent")
  f67f5f90132583de85abf0d61fed2a2144be1f04
You can see how the examples show that slight changes in the message dramatically change the output. Feel free to download the process below. All subroutines are included for your convenience. Good luck!
Bitwise Operators (aka Bits, Bits, Bits Part II)
Did you know that Mata supports bitwise operators? Well, it actually doesn't – in the typical sense. But that won't stop us from making it work. You see, Mata can handle data extremely well, and with a little finesse, can be forced to do things it wasn't really made to do. Yes it's going to be slow, and yes it's probably not very useful to the average user, but let me try to convince you how great using Mata really is!
For those who don't know, Mata is a lower level language than Stata – many of Stata's complex functions are actually written in Mata because it's really quite fast. Mata mimics a lot of C's syntax, but also simplifies things so you don't feel like you have to explicitly declare everything. In previous posts we've exploited the power of the - inbase() - function and we will make ample use of that today. Say we have a text file containing the word "Chunk". While we see a word, the computer sees numbers which correspond to each letter – otherwise known as ASCII. Mata's - ascii() - function can help us find this representation: 
This is a simple way of converting our text into numbers, but how about into bytes? Typically, bytes are displayed in base 16:

But now we want to see each bit. Remember, I'm not a computer scientist, so you can trust me when I say this really isn't all that bad for those of you who haven't been exposed to this stuff. Just know that each of these bytes contains 8 bits. Each bit can either be on or off (1 or 0) which means that there’s a total possible bit combination of 2^8 = 256 per byte. Let's look at what Stata shows us when we look at everything in base 2:

Notice, I added a zero and a one at the end of the text string "chunk" for illustrative purposes. Why are these values not 0 and 1 respectively? That’s because the digits are also ASCII characters (digits 48 and 49). We can get the values of zero and one by using the - char() - function. For fun, we'll also look at values two and three as well.

Well, because there are technically 8 bits per byte, we need to pad each output with zeros so that the total length is 8 bits. For example: the value "3" can be written as "11" in base 2, but is the same "00000011" so that we can imagine all 8 bits. We can easily accomplish this in matrix form.

Notice the use of the colon operator? It's by far one of my favorite operands (not that I have that many) because it does the same operation on each element of the matrix, which makes the overall statement extremely succinct! The statement above just says: "Give me some zeros, exactly 8 minus how every many numbers we had, and append the original statement to the end to make sure every element has exactly 8 digits."
We should probably make this into a function, since we’ll use it a lot. So let's make the size of the padding an input as well.
mata:
string matrix padbit(string matrix x, real scalar padnum)
{
        string matrix y
        y = "0" :* (padnum :- strlen(x)) :+ x
        return (y)
}
end
mata: padbit(chunk, 8)
|
|||||||||||||


| bitwise-mata-functions.do |
Shifts and Rotations
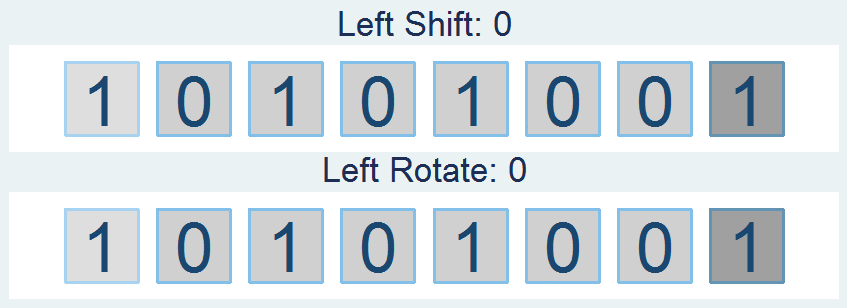
It's interesting to follow, though not all that interesting if it doesn't have a practical application. If you're like "honestly, I don’t know nothing about bit functions", I'll say - well I've got the one you. How about a way to easily encrypt your files so that you can hide your sensitive stuff in plain sight? First find a file and read it in:
// Read in File to Copy
fh  = fopen("Building an API Library.docx", "r")
eof = _fseek(fh, 0, 1)
fseek(fh, 0, -1)
x = fread(fh, eof)
fclose(fh)
Convert the file characters to the ASCII decimal value then convert this number into the base 2 representation (don't forget to pad the bits). From here, we can use our bitwise operations before converting this number back to base 10 and finally back to characters:
// Run Bitwise Not
y = padbit(inbase(2, ascii(x)), 8)
for (i=1; i<=cols(y); i++) {
        y[i] = bitnot(y[i])
}
y = char(frombase(2, y))
Lastly, write your newly altered file using Mata. This is obviously very basic, but a great way to hamper nosy coworkers.
// Write the Results to File
fh = fopen("Copy.docx", "w")
fwrite(fh, y)
fclose(fh)
But really, we're doing this with the ultimate goal of gaining access to Twitter data using Twitter's API. This is just step one of a three part series and if you're lost so far. there's plenty of time to see the motivation for this post in the next step. I promise it gets more interesting, yet I hope I've shown some of Mata's potential and how you can easily bring in the concepts to your own do-files.
Why Care Block:
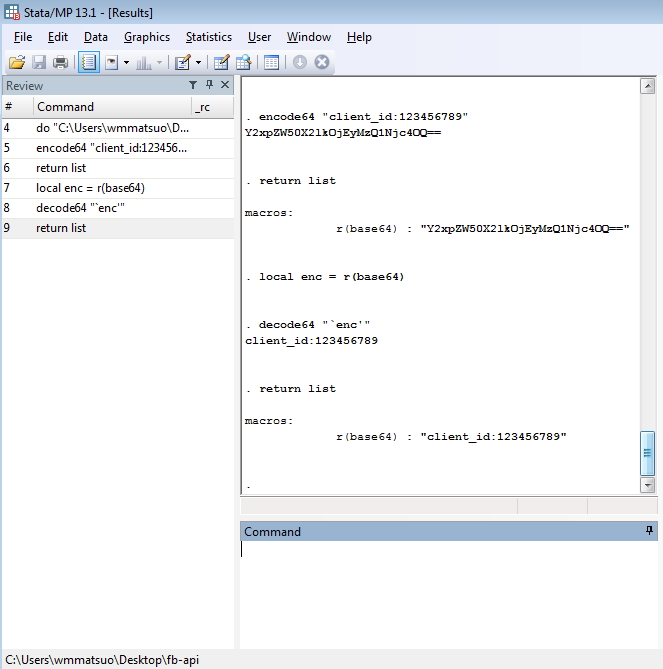
Base64 encoding is extremely common when using API services, such as the Fitbit API, but that’s about all I know. It’s necessary to get the job done and isn’t readily available in Stata.
Base64 encoding exists for some privacy purpose. That's about all I want to say about Base64 encoding. Let's just look at an example, they’re a lot cooler.
Say for instance we have the phrase: “This is kinda boring…”
By converting every character to ASCII bytes (and by potentially adding padding), converting each byte to base 2, taking the 8-bit representation of the binary character and convert it to a six bits, converting that back to base 10, and using those numbers (they fall between 0 and 63) to look up the corresponding character of the alphabet plus two other characters, we finally arrive at the following encoded string:
"VGhpcyBpcyBraW5kYSBib3JpbmcuLi4="
While they mean the same thing, I think the first phrase was a little more accurate. We can encode this second phrase a second time and it gives us:
"VkdocGN5QnBjeUJyYVc1a1lTQmliM0pwYm1jdUxpND0="
Now you can easily send encoded messages to your friend (not plural – I can't imagine that many people would tolerate this type of behavior). I’ve put together a Stata package containing these routines; however, no help file is available upon the first release. Here is a brief overview of the new commands, encode64 and decode64 at work.
| encode64.ado |
First, I want to take the opportunity to stress version control. Always begin your do-files with the version command. If you don’t, you’ll likely get the error r(101) “using not allowed” when trying to implement your old putexcel commands in a do-file. A quick note about version: you must run this command with the putexcel statement. Just having it at the top of your do-file and calling it doesn’t work, unless you run the do-file all the way through. Think of using version control like using a local macro.
What I like:
…but it requires changing the way you think about putexcel. Think of the command in a more modular structure.
- Set your Excel file that you wish to beautify
- Put all your text/data into the spreadsheet
- Format blocks of like things
Example:
putexcel set MyBook.xlsx, sheet("MyData")
putexcel A1=("Title of Data") A2=("Subtitle") A3=formula("SUM(A4:A20)"), bold
putexcel A3:A20, nformat(number_sep) hcenter
The updated options simplify your code a bit:
No more bold(on), rather just bold or nobold and there’s no need for that modify command.
Update: as of the December 21st update, modify is an option again...
Advanced number formats may be used:
No more restrictions, the advanced number format can now be used and can be found under putexcel advanced – which makes sense since it was able to be used already in the Mata xl() object.
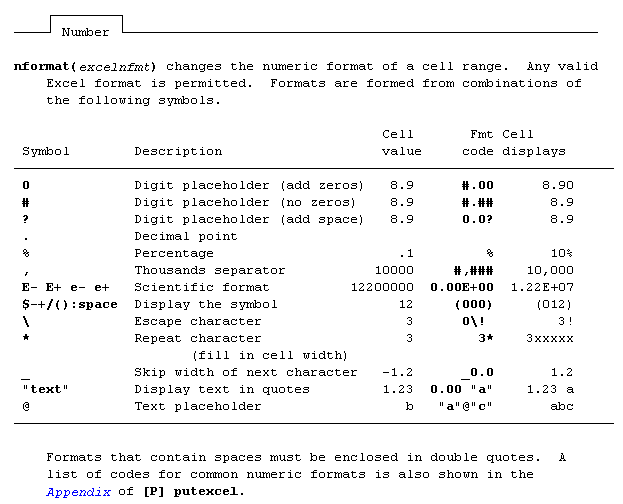
putexcel set MyBook.xlsx, sheet("MyData")
putexcel A3, nformat(#.000) nobold border(all)
What I don't like:
The new syntax – it’s very difficult to work with large files, which is why I’ll be sticking with my “version 14.0” command when writing putexcel statements to large excel files. Why? I cannot find a simple way to write different format-types in one statement (say bold font in cell A1 and a border around cell B2). I have to do this in two separate commands. This is a big problem when you’re working with large excel files because Stata keeps opening the file, saving it, and closing the file for EVERY putexcel statement. We could waste minutes writing borders and adding different colors. Granted, Excel files shouldn’t be 40MB but we have them; and management wants to keep them that way, putting the Stata programmer between a rock and a hard place. Check out my previous post on “block” putexcel for working with very large excel files.
What I hope happens:
On writing binary files in Stata/Mata
We start by making up a fake type of file called a wmm file. This file always begins with the hex representation ff00, which we know just means 255-0 in decimal or 11111111 00000000 in binary. The next 20 characters spell out “Will M Matsuoka File” followed by a single byte containing the byte order or 00000001 in binary. From there, the next four bytes contains the location of our data as we put a huge buffer of zeros before any meaningful data. It makes sense to skip all of these zeros if we know we don’t need to ever use them. After these zeros, we’ll store the value of pi and end the files with ffff.
The file looks like this:
Stata's File Command
tempname fh

file open `fh' using testfile.wmm, replace write binary

file write `fh' %1bu (255) %1bu (0)
file write `fh' %20s "Will M Matsuoka File"

file set `fh' byteorder 1
file write `fh' %1bu (1)

* offset 200
file write `fh' %4bu (200)

forvalues i = 1/200 {
        file write `fh' %1bs (0)
}

file write `fh' %8z (c(pi))
file write `fh' %2bu (255) %2bu (255)

file close `fh'
The only thing I feel I need to note here is the binary option under file open. Other than that, take note that we’re setting the byteorder to 1. This is a good solution to writing binary files; however, since most of my functions are in Mata, we might as well figure out how to do this in Mata as well.
Mata's File Command
mata:
fh = fopen("testfile-fwrite.wmm", "w")

fwrite(fh, char((255, 0)))
fwrite(fh, "Will M Matsuoka File")

// We know that the byte order must be 1
fwrite(fh, char(1))

fwrite(fh, char(0)+char(0)+char(0)+char(200))
fwrite(fh, char(0)*200)

fwrite(fh, char(64) + char(9) + char(33) + char(251) +
        char(84) + char(68) + char(45) + char(24))

fwrite(fh, char((0,255))*2)
fclose(fh)
end
I personally like the aesthetic of this syntax; it’s clean, neat, and relatively simple. The only problem is its ability to handle bytes. In short, it doesn’t do it at all. We’d have to build some more functions in order to accomplish this task (especially when it comes to storing double floating points) which is why Mata also has a full suite of buffered I/O commands. It’s a little more complicated, but well worth it. After all, we cheated in converting pi to a double floating storage point by using what we wrote in the previous command. This is not a good practice.
Mata's Buffered I/O Command
mata:
fh = fopen("testfile3-bufio.wmm", "w")

C = bufio()
bufbyteorder(C, 1)

fbufput(C, fh, "%1bu", (255, 0))
fbufput(C, fh, "%20s", "Will M Matsuoka File")

// We know that the byte order must be 1
fbufput(C, fh, "%1bu", bufbyteorder(C))

fbufput(C, fh, "%4bu", 200)
fbufput(C, fh, "%1bu", J(1, 200, 0))

fbufput(C, fh, "%8z", pi())

fbufput(C, fh, "%2bu", (255, 255))
fclose(fh)
end
The one distinction here is the use of the bufio() function. It creates a column vector containing the information of the byte order and Stata’s version, but allows us to use a range of binary formats available to use in Stata’s file write commands.
Reading the Files Back
mata:
void read_wmm(string scalar filename)
{
        fh = fopen(filename, "r")
        C = bufio()

        fbufget(C, fh, "%1bu", 2)
        if (fbufget(C, fh, "%20s")!="Will M Matsuoka File") {
                errprintf("Not a proper wmm file")
                fclose(fh)
                exit(610)
        }

        bufbyteorder(C, fbufget(C, fh, "%1bu"))

        offset = fbufget(C, fh, "%4bu")
        fseek(fh, offset, 0)

        fbufget(C, fh, "%8z")

        fclose(fh)
}

read_wmm("testfile-fwrite.wmm")
read_wmm("testfile.wmm")
read_wmm("testfile3-bufio.wmm")
end
And there you have it, a bunch of different ways to do the same thing. While I enjoy using Mata’s file handling commands for its simplicity, it does get a little cumbersome when writing integers longer than 1 byte at a time. Time to start making your own secret file formats and mining data from others.
Exif, or exchangeable image file format, is a way to store information on your images or audio file. If you have an iPhone, you will probably notice that you can actually view your images on a map, and it shows you where and when you took the picture. This is really neat, especially if you’re a photo editor and need to match light or camera settings in Photoshop without having access to the physical camera. However, this is also incredibly dangerous. Here is a quick look at the properties of a photo I took with my iPhone 5.
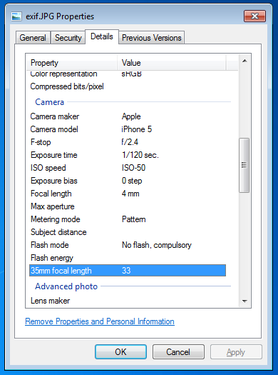
Exif data are stored in the header of your picture. What the heck does that mean? Every picture contains a header, and most new cameras and cell phones will actually write this data in the header. Your computer then reads this information and is able to tell your location, camera settings, and time stamps of the photo. One section actually contains all of the Exif tags – it’s really just a collection of information. In order to read this information, we have to read in the picture file which is a series of zeros and ones. Yup, we’re using Mata’s bufio() functions to read in all of this information. Bufio() allows us to write not only string characters, but also binary integers into files without using Stata’s file command. I will bore you with the details in a subsequent post, but for now, I’d like to introduce my program – exiflatlon – which strips JPG, TIF, and WAV file formats of latitude and longitude information. It can be used in two ways:
- On a single file: returning the results in either the return list or a new dataset
- On a directory: stripping all files of this information within a directory and creating a new dataset containing GPS coordinates of said files
Let’s try out the directory specification.
exiflatlon, dir("C:\users\wmmatsuo\desktop")
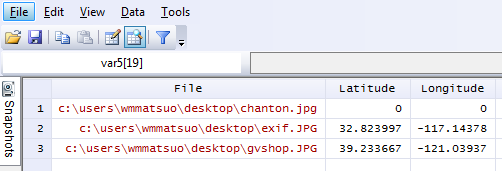
In the event there is no exif information, exiflaton will provide you with a warning and will replace those latitude values and longitude values with zeros in the resulting dataset. It only takes milliseconds to rip the locations off each photo – and this is valuable information, especially if you don’t want the wrong type of people (or really anyone) tracking you. While I only use Stata for good, there are likely people who use it for bad purposes. Only joking, Stata users are never malicious, but there are plenty of other programmers who are and who have more efficient tools at their disposal for such (and maybe creepier) purposes. In today’s age, we need to be careful about safeguarding our data because there are no moral boundaries when it comes to taking data. Companies love information, and will not hesitate to steal this information. After all, hiding the fact that “by entering this premise, you consent to us taking all your information from your ID” is in no way consent when it’s not clearly stated. I’m looking at you, True North Tavern...
In looking back at my experience at work, it’s easy to forget what I have done, and even easier to forget what I do on a day-to-day basis. In order to help jog my memory, I wrote a crawler that scrapes all of our directories and all my personal files for any do-files I have written in these past two years. I image the Twelve Days of Christmas tune when going over this list… but I really shouldn’t.
2 million words a-written
200,000 lines of codes
1,700 do-files
1,250 SQL statements
830 graphs
230 times invoking Mata
100 programs
All influenced by 3 coworkers that greatly shaped my code.
| wills_words.txt |
However, with a few simple Mata commands, the crisscross of equal signs, dollar signs, and formulas can turn a repetitive task into a few simple copy-and-paste commands. There is also less room for error. For fun, we'll do this entire thing in Mata. First, we need to decide how many observations/variables we need. Let’s look at our current workbook and target workbook.
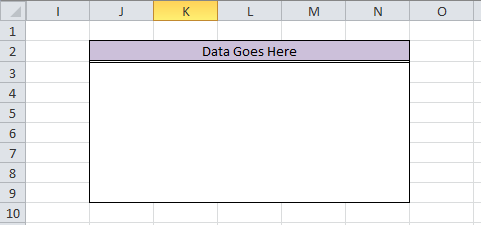
BookA: Destination Cells
|
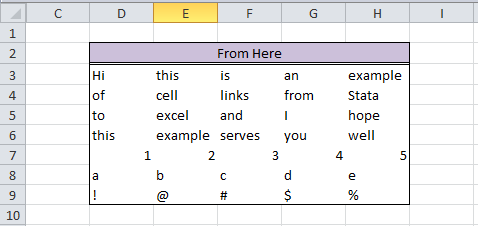
Source Cells
|
mata:
st_addobs(7)
st_addvar("str255", "v" :+ strofreal(1..5))
Starting with a blank dataset, add seven observations. From there, we create 5 variables (v1 v2 v3 v4 v5) that are all of type str255. This is a placeholder value for long equations. The second part of this command “v” :+ strofreal(1..5) is my favorite part about Mata. The colon operator (:+) is an element-wise operator that is super helpful. No more Matrix conformability errors (well maybe a few). It creates the matrix:
("v1", "v2", "v3", "v4", "v5")
without much work and allows for any number of variables! Sidenote – changing (1..5) to (1..500000) took about 3 seconds to create 500,000 v#’s. Next, let’s set up our workbook name:
bookname = "'C:\Users\wmmatsuo\Desktop\[BookB.xlsx]Linked'!"
Specify the location of the workbook with the file name in square brackets and enclose the sheet name in apostrophes. End that expression with an exclamation point! Since we know we want D through H, and cells 3-9, we can write the following:
cols = numtobase26(4..8)
rows = strofreal(3::9)
numtobase26() turns 4 through 8 into D through H. For more information see my previous post on its inverse. The rows variable is a column vector containing values 3 through 9. Now it’s time to build our expression:
expr = "=" :+ bookname :+ "$" :+ J(7, 1, cols) :+ "$" :+ rows
We put an equals sign in front of everything so that Excel will know we’re calling an equation. Follow that with the workbook name. If you didn’t know, dollar signs in excel will lock your formulas so they don’t move when you copy formulas from one cell to another. We’ll put those in as well.
The next part, J(7, 1, cols), takes our column letters and essentially repeats it seven rows down. Thanks to the colon operator, we just have to add another dollar sign to all elements of the matrix and our row numbers. Since the new cols matrix contains seven rows, and our row vector contains seven rows, it knows to repeat the row values for all columns.
Let’s just put that matrix back into Stata and compress our variables.
st_sstore(., ("v" :+ strofreal(1..5)), expr)
stata("compress")
end
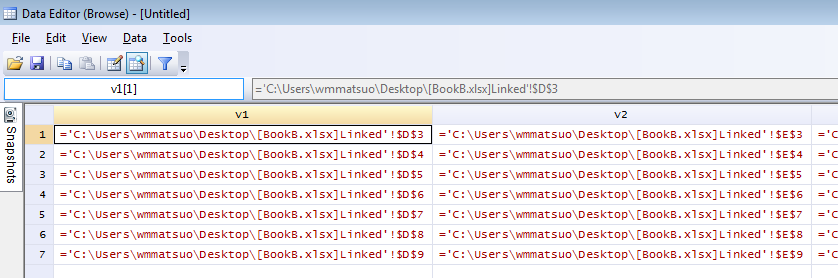
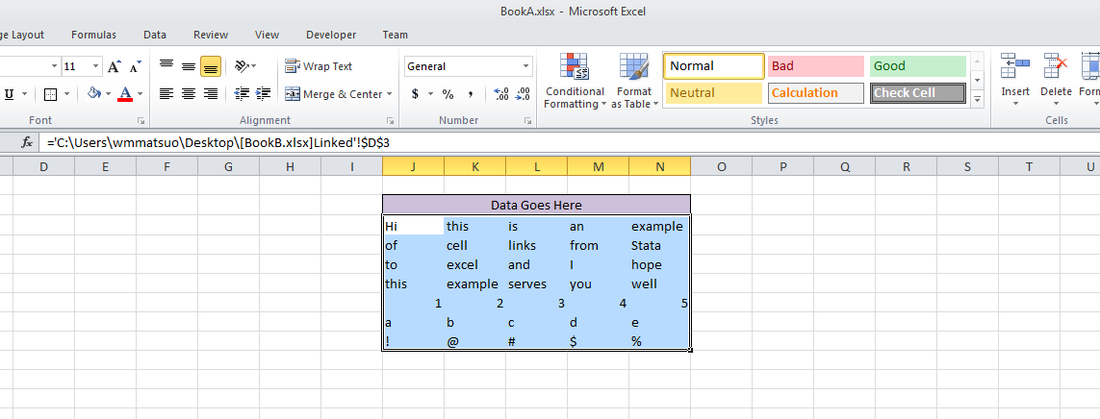
And voilà, we have a set of equations ready to copy into Excel. One quick tip: set your copy preferences so that when you copy the formulas, you won’t also copy variable names by going to edit->preferences->data editor-> uncheck “Include variable names on copy to clipboard”. Now just copy the equations directly from your Stata browse window into Excel, and enjoy those sweet results!
In other news, this post built upon the putexcel linking discoveries found over at belenchavez.com - who recently had her Fitbit stolen! Follow her journey to get it back on her website or on Twitter - hopefully she'll be able to coerce the thief into returning the device.
The heart rate of my #fitbit thief pic.twitter.com/jM3V3g88V7
— Belen (@_belenchavez) October 10, 2015
Author
Will Matsuoka is the creator of W=M/Stata - he likes creativity and simplicity, taking pictures of food, competition, and anything that can be analyzed.
For more information about this site, check out the teaser above!
Archives
July 2016
June 2016
March 2016
February 2016
January 2016
December 2015
November 2015
October 2015
September 2015
Categories
All
3ds Max
Adobe
API
Base16
Base2
Base64
Binary
Bitmap
Color
Crawldir
Email
Encryption
Excel
Exif
File
Fileread
Filewrite
Fitbit
Formulas
Gcmap
GIMP
GIS
Google
History
JavaScript
Location
Maps
Mata
Music
NFL
Numtobase26
Parsing
Pictures
Plugins
Privacy
Putexcel
Summary
Taylor Swift
Twitter
Vbscript
Work
Xlsx
XML
 RSS Feed