|
With the release of Stata 14.1, Stata made a good amount of changes to one of my favorite commands: putexcel – I have mixed feelings about this.
First, I want to take the opportunity to stress version control. Always begin your do-files with the version command. If you don’t, you’ll likely get the error r(101) “using not allowed” when trying to implement your old putexcel commands in a do-file. A quick note about version: you must run this command with the putexcel statement. Just having it at the top of your do-file and calling it doesn’t work, unless you run the do-file all the way through. Think of using version control like using a local macro. What I like:
Putexcel has been simplified…
…but it requires changing the way you think about putexcel. Think of the command in a more modular structure.
Example:
putexcel set MyBook.xlsx, sheet("MyData")
putexcel A1=("Title of Data") A2=("Subtitle") A3=formula("SUM(A4:A20)"), bold
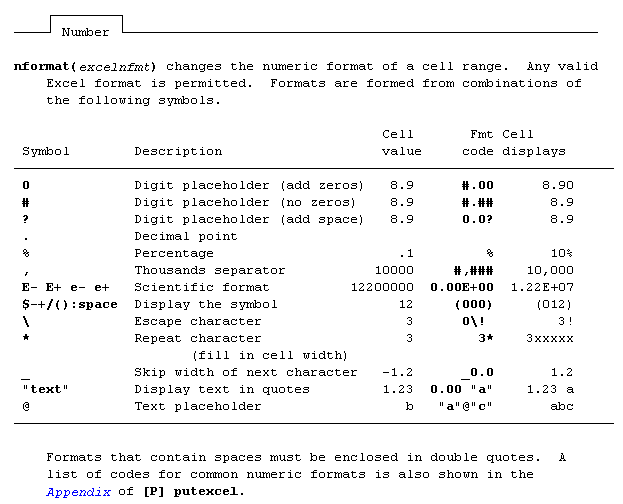
putexcel A3:A20, nformat(number_sep) hcenter
.
The updated options simplify your code a bit: No more bold(on), rather just bold or nobold and there’s no need for that modify command. Update: as of the December 21st update, modify is an option again... Advanced number formats may be used: No more restrictions, the advanced number format can now be used and can be found under putexcel advanced – which makes sense since it was able to be used already in the Mata xl() object.
putexcel set MyBook.xlsx, sheet("MyData")
putexcel A3, nformat(#.000) nobold border(all)
What I don't like:
Using not allowed! I liked the using statement within putexcel, especially when I needed to add something as simple as a title on an excel spreadsheet. Now, I have to use two lines of code instead of one. This is a minor complaint compared to the next section.
The new syntax – it’s very difficult to work with large files, which is why I’ll be sticking with my “version 14.0” command when writing putexcel statements to large excel files. Why? I cannot find a simple way to write different format-types in one statement (say bold font in cell A1 and a border around cell B2). I have to do this in two separate commands. This is a big problem when you’re working with large excel files because Stata keeps opening the file, saving it, and closing the file for EVERY putexcel statement. We could waste minutes writing borders and adding different colors. Granted, Excel files shouldn’t be 40MB but we have them; and management wants to keep them that way, putting the Stata programmer between a rock and a hard place. Check out my previous post on “block” putexcel for working with very large excel files. What I hope happens:
We get the best of both worlds – the putexcel set keeps the Excel file open, so that it doesn’t continuously save file after file but the new format stays. If we have a putexcel set, why not putexcel close? Oh, and using is added back as an optional/hidden feature of putexcel. That, my friends, would be my ideal putexcel command: not too hot, not too cold; simple, yet powerful.
12 Comments
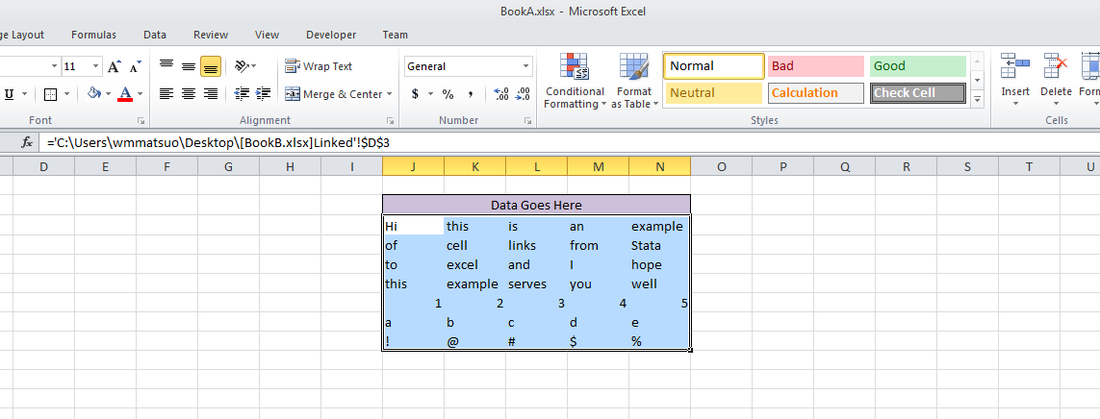
Coercion. It’s the topic of the day, and a short topic at that. Coercion is the leading driver for Excel usage for most Stata users. Workbook linkage is usually a pain – the practice of linking one cell from a workbook to a different cell in another workbook – and can turn a relatively simple task into a nightmare usually ending the job with a headache and a stiff drink.
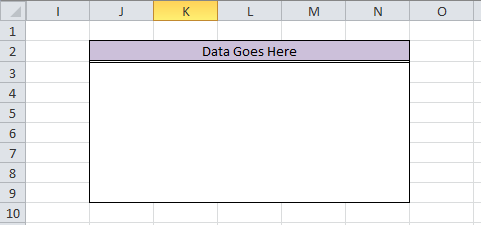
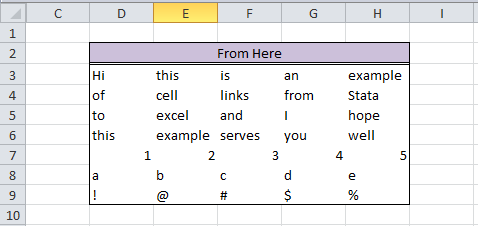
However, with a few simple Mata commands, the crisscross of equal signs, dollar signs, and formulas can turn a repetitive task into a few simple copy-and-paste commands. There is also less room for error. For fun, we'll do this entire thing in Mata. First, we need to decide how many observations/variables we need. Let’s look at our current workbook and target workbook.
So we need 5 columns and 7 rows, with columns from D to H and rows from 3 to 9 in our BookB set. Write it:
mata:
st_addobs(7)
st_addvar("str255", "v" :+ strofreal(1..5))
Starting with a blank dataset, add seven observations. From there, we create 5 variables (v1 v2 v3 v4 v5) that are all of type str255. This is a placeholder value for long equations. The second part of this command “v” :+ strofreal(1..5) is my favorite part about Mata. The colon operator (:+) is an element-wise operator that is super helpful. No more Matrix conformability errors (well maybe a few). It creates the matrix:
("v1", "v2", "v3", "v4", "v5")
without much work and allows for any number of variables! Sidenote – changing (1..5) to (1..500000) took about 3 seconds to create 500,000 v#’s. Next, let’s set up our workbook name: bookname = "'C:\Users\wmmatsuo\Desktop\[BookB.xlsx]Linked'!" Specify the location of the workbook with the file name in square brackets and enclose the sheet name in apostrophes. End that expression with an exclamation point! Since we know we want D through H, and cells 3-9, we can write the following: cols = numtobase26(4..8) rows = strofreal(3::9) numtobase26() turns 4 through 8 into D through H. For more information see my previous post on its inverse. The rows variable is a column vector containing values 3 through 9. Now it’s time to build our expression: expr = "=" :+ bookname :+ "$" :+ J(7, 1, cols) :+ "$" :+ rows We put an equals sign in front of everything so that Excel will know we’re calling an equation. Follow that with the workbook name. If you didn’t know, dollar signs in excel will lock your formulas so they don’t move when you copy formulas from one cell to another. We’ll put those in as well. The next part, J(7, 1, cols), takes our column letters and essentially repeats it seven rows down. Thanks to the colon operator, we just have to add another dollar sign to all elements of the matrix and our row numbers. Since the new cols matrix contains seven rows, and our row vector contains seven rows, it knows to repeat the row values for all columns. Let’s just put that matrix back into Stata and compress our variables.
st_sstore(., ("v" :+ strofreal(1..5)), expr)
stata("compress")
end
And voilà, we have a set of equations ready to copy into Excel. One quick tip: set your copy preferences so that when you copy the formulas, you won’t also copy variable names by going to edit->preferences->data editor-> uncheck “Include variable names on copy to clipboard”. Now just copy the equations directly from your Stata browse window into Excel, and enjoy those sweet results! In other news, this post built upon the putexcel linking discoveries found over at belenchavez.com - who recently had her Fitbit stolen! Follow her journey to get it back on her website or on Twitter - hopefully she'll be able to coerce the thief into returning the device.
Did you know that Mata has a hidden command called numtobase26? Given its usefulness with putexcel, I can’t possibly see why it’s hidden! Perhaps Stata doesn’t want us using their highly-tuned statistical analysis software as a glorified spreadsheet beautifier. Nevertheless, you may be forced to automate a god-awful excel report in order to free up time to utilize Stata to the fullest!
This is where we start to depart from our beloved putexcel, and shift slightly towards xl(). Both commands tend to serve the same purpose, but much like Stata vs. Mata, putexcel is meant for the layman, and Mata is meant to make things fast while being slightly less readable. Gross oversimplification aside, putexcel favors the traditional spreadsheet alphabetical columns names combined with row numbers A1, A2, A3 whereas xl() generally takes the r1, c1 form. Say you have a dataset with 50 variables: v1, v2, v3, …, v50 and you wish to rename the variables so that they match the rows of excel. We could try and loop through the alphabet c(ALPHA), but once you get to Z, things start to get tricky. For me, a much simpler solution is to use numtobase26. For those unfamiliar with Mata, you can make a vector of sequential numbers with ease: mata: (1..50)
We have a row vector with 50 elements that we can now convert to our excel column names using:
mata: numtobase26((1..50)) A B C D E F G H I J K L M N O P Q R S T U V W X Y Z AA AB AC AD AE AF AG AH AI AJ AK AL AM AN AO AP AQ AR AS AT AU AV AW AX
We just need to store it as a local so we can use it easily in Stata. (Also concatenate the elements)
mata: st_local("alphavars", invtokens(numtobase26(1..50)))
ren * (`alphavars'), dry
You can imagine how this can greatly simplify creating putexcel functions that require you to reference columns by their excel name using a simple foreach var of varlist * combined with the levelsof technique described in Part I. Codebook
What happens if you want to go the other way? Say you have the column BC12 but you wish to convert this to 55, 12 so you can use it in one if xl()’s many functions. Unfortunately, I could not find an easy solution, so I made a rough fix that should be similar to how putexcel handles its cell expressions. Feel free to use the numofbase26() Mata function if you ever find yourself in this predicament.
real matrix numofbase26(string matrix base)
{
    real matrix output, pwr, b
    real scalar i, j, k, l

    base = strupper(base)
    output = J(rows(base), cols(base), .)

    for (i=1; i<=rows(base); i++) {
        for (j=1; j<=cols(base); j++) {
            if (strlen(base[i,j]) == 1) output[i,j] = ascii(base[i,j]) - 64
            else {
                l = strlen(base[i,j])
                b = pwr = J(1, l, .)
                for (k=1; k<=l; k++) {
                    b[1,k] = ascii(substr(base[i,j], k, 1)) - 64
                    pwr[1, k] = l - k
                }
                output[i,j] = rowsum(b :* (26:^pwr))
            }
        }
    }
    return(output)
}
Happy Automating! I promise the next post will contain less technical stuff and more pictures.
Check it: Excel Art.
Stata 14 – a cause for fanfare – expanded Stata’s abilities to format excel files. Sounds exciting right? You’re damn right. Excel files no longer have to be pre-templated before the dreaded export excel messes up your number formatting. Putexcel used to alleviate this problem in Stata 13, but only for numeric matrices. Luckily for us those days are long lived but long gone, and putexcel evolved into a very useful command.
So what’s the first step in creating this captivating art? Finding an easily parsable file format of course. The EPS (Encapsulated PostScript) format does just that – take a look for yourself: EBEBEBEBEBEBEBEBEBEBEBEBEBEBEBEBEBEAEAEAEBEBEBEBEBEBEBEBEBEBEBEB EAEAEBEBEBEBEAEAEBEBEBEBEBEBEBEBEBEBEAEAEBEBEBEBEBEBEBEBEBEBEBEB EAE4E7E5E3DECFB292948D97A29D9F9D9FA9A6A49477726A5D4F484A4742484B 453B36302E2C302E2F3735332C2B32322C2D393C423E3738404950575E5F605B 545D655D5E5C5E6C6972767D888D9DA9B4B9BAC1B7ADA19995907A66646E6C7C 9099B7A99F9E9CADAB97838FB1CDE1E9ECEBEBEBEBEBEBEBEBEBEBEBEBEBEBEB EBEBEAEAEBEBEBEBEBEBEBEBEBEBEBEBEBEBEBEBEBEBEBEBEBEBEBEBEBEBEBEB EAEAEBEBEAEAEAEAEAEAEAEAEAEAEAEAEAEAEAEAEAEAEAEAEAEAEBEBEBEBEBEBThere’s no binary, just text. And while it may look like the transcript of a sugared-out toddler, it contains a lot of good color information. The first thing to know is that all colors we deal with are related to light. The three additive primary colors are red, green, and blue. If you ever looked closely at an old TV screen (like I did as a young’un), you’d see these three distinct colors. In this case, each color uses 8 bits: 2*2*2*2*2*2*2*2 = 256 possible combinations per color. Each color then gets a number from 0-255. Zero means the color is off while 255 corresponds with a full-on color! So RED in RGB mode would look like this: “255 0 0”. Converting this number to base 16 yields “FF 00 00” or “FF0000” without spaces. Going backwards: “EAE4E7” is the same as “EA E4 E7” which converts to “234 228 231” in base 10. This is made easy with Mata’s frombase command. After a few tricks - such as finding the right order of the data stored - we’re able to convert the previous gibberish to pixel information/excel cell information. This is where putexcel gets good. The matrix of color information is passed to a Stata dataset so that it utilizes the fpattern cell expression of putexcel. An example Stata variable would look like this: V1 A1=fpattern(“solid”, “234 243 243”) A2=fpattern(“solid”, “234 243 243”) A3=fpattern(“solid”, “234 243 243”) Because we have a column of strings we can use the levelsof command to create a list containing each of these expressions and write them directly using the putexcel command. Now we’re ready to shake shake shake out that final command:
foreach v of varlist * {
        levelsof(`v'), local(`v') clean
        local cellexp = "`v' `cellexp'"
}

local cellexp = subinstr("`cellexp'", " ", "' ", .)
local cellexp = subinstr("`cellexp'", "v", "`v", .)
putexcel `cellexp' using "Art.xlsx", sheet("LoveStory") replace
The trick here is using the option "clean" in our levelsof command to strip all the double quotes so that we can use it directly in our putexcel statement. While we could have included the putexcel statement within the loop, the advantage here is that, because we’re only calling the command once, we don’t have to continually open and close the excel file for each putexcel statement - making it run in seconds. Now we’re ready to find our Starbucks lovers, get in fights at 2:30 am, and never ever get back together because we just saved ourselves so much time! Can you spot all the Taylor Swift references? I count seven. |
AuthorWill Matsuoka is the creator of W=M/Stata - he likes creativity and simplicity, taking pictures of food, competition, and anything that can be analyzed. Archives
July 2016
Categories
All
|


 RSS Feed