Why Care Block:
Yo yo, what’s up my Stata-ites! DJ Control+D is in the house because today we’re talking about making music with Stata. There’s a big trend in today’s age involving visualizations, but truth be told, visualizations are so last season. You’ve always been able to see your data, yet have you ever wanted to hear your data? “That’s absurd, I don’t need that.”
Yeah, you’re probably right... but today, this post is for the slacker: from the undergraduate struggling through their Stata homework, to the professional who’s bored with the day-to-day grind, our new command composer is there to brighten up your day and aid with your ever evolving procrastination techniques. What is composer? It’s a way to create music. How is that music generated? You write a string of notes that get converted to the midi file format. Why did we do this? I’m still asking myself that same question while introspectively reevaluating my life. Truth be told, I love music. Not in the traditional sense, but in the very traditional sense – classical music and music theory has always been a passion of mine and this has been a passion project for a long time now. 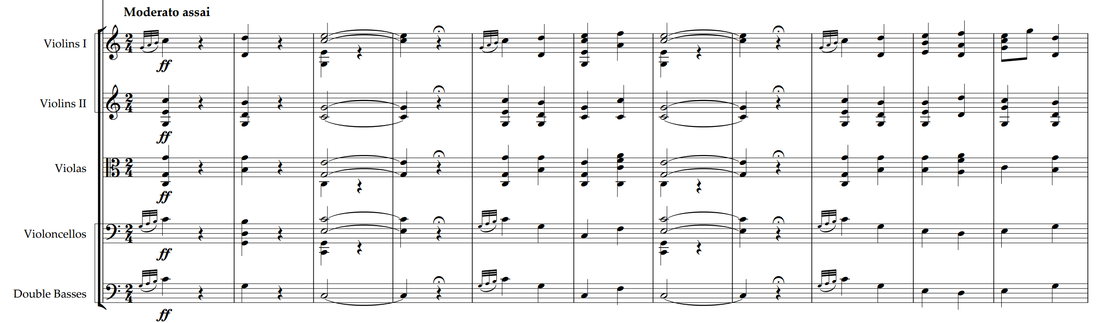
Composer makes music in two separate ways. You can write songs from the command line and from a dataset. The command line approach is faster and is especially meant for ad hoc procrastination. The dataset approach is a more methodical way of creating music and actually allows for multiple tracks and multiple instruments. Take our command line approach: composer "D, 384D, A, A, B, B, *2A, G, G, F#, F#, E, E, *.25r, *.25Db, 768D" using tt.mid, play replace We could have also written this first part as D, D, A, A, B, B, 768A, but it’s good to see the variations of this command. First we have notes: A, B, C, D, E, F, and G. Each note can be modified using a # (sharp) or a b (flat) which directly follows the note. A number before the note shows the duration of the note. The quarter note takes the value 384 (3*2^7). This way it can be halved up to seven times with 384 representing a quarter note, 192 representing an eight note, 96 a sixteenth note, and so on. Rather than specify a value, you may also multiply the note by a number to modify the value of the quarter note. Any number following your note denotes which octave or pitch your note will take. You may also change the instrument using a number or a named instrument available in the composer help file. For instance, say we wrote:
local n1 = "F#,A,E6,D6,E6,D6,A,D6"
local n2 = "E,A,E6,D6,E6,D6,A,D6"
local n3 = "F#,B,E6,D6,E6,D6,B,D6"
local n4 = "G,A,E6,D6,E6,D6,A,D6"
composer "`n1',`n1',`n2',`n2',`n3',`n3',`n4',`n4'" using ls.mid, play replace instrument("Pizzicato") bpm(240)
See if you can identify the song! Now take our data set approach. It’s just like the command line approach, except the command now takes sets of three variables: time duration, note, and octave. Notes can be played simultaneously by adding another track (three more variables). This way we can build chords and add volume to our masterpieces just like Beethoven. But unlike Beethoven, we’re not creating classical masterpieces, we’re recreating pop music. If you weren’t able to pinpoint the song before, here’s the dataset aided version of our previous track.
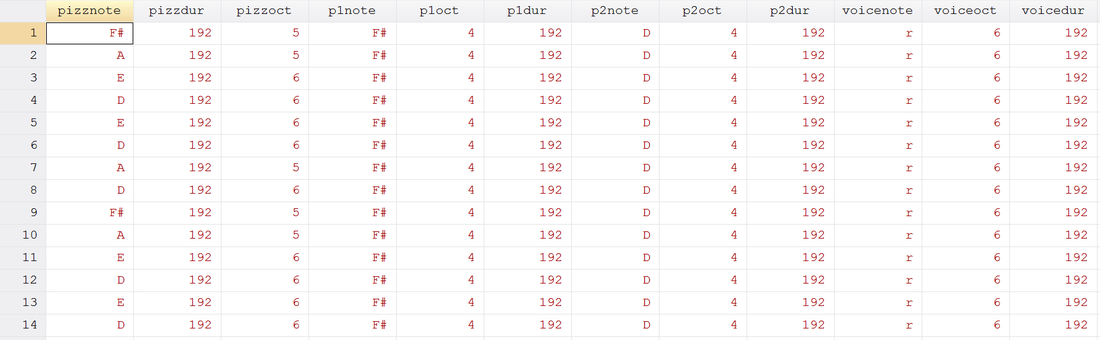
ls.dta Contents
use http://www.wmatsuoka.com/uploads/2/1/4/6/21469478/ls.dta, clear
composer pizzdur pizznote pizzoct p1dur p1note p1oct p2dur p2note p2oct voicedur voicenote voiceoct using ls.mid, play replace bpm(120) instrument(Pizzicato Pizzicato Pizzicato Voice)
And there we have it, a fairly easy way to write music in Stata. Is this interesting? I hope so, especially if you’ve made it this far. I’m sure you’re wondering how useful this is though. Truth be told, this is probably one of the only things on this blog that I haven’t found a general use for but perhaps you can find some sort of practical application and share your thoughts. There will be one more post about music soon which deals with the actual analysis of music which will use composer. Until then, good luck and stay creative future Stata maestros!
25 Comments
Why Care Block:
Let’s be clear, I really like Stata graphics! There are people out there that complain about Stata graphics not looking flashy enough, but this is a really good thing – you have to know enough about the Stata graphics suite to make a graph look as bad as many new-excel-user graphs. “Let’s add drop shadow, 3D, hovering label boxes, gradients, and lots of pictures” is a good idea when you’re the van Gogh of graphics, but most of these graphs end up resembling more of a Picasso leaving the audience asking whether that’s a y-label, or a text box, or maybe even an eye…
You may have noticed that there’s been a significant gap in these posts over the last few months and it’s been completely intentional. My talented friend, Belen, and I have been studying Stata graphics enough to be labeled as completely crazy, but at least it has resulted in a marvelous presentation for the Stata User Group meeting. This process involves a lot of JavaScript and Stata integration to produce Tableau-like interactive graphs using the same familiar syntax that all Stata users know and love. However, that’s not what we’re talking about in this post, no, get ready because today we are switching to graphic design with help from Adobe’s Creative Cloud! Look, all math and no art makes for some REALLY boring posts – and we strive to make sure no post is too boring. So we’ll spice things up by combining fitness, art, and math into one! Before we go any further, if you’d like to follow along you might need to get yourself a copy of Adobe Illustrator CC which comes with a free 30-day trial. Adobe Illustrator is a lot like the more commonly known Photoshop, but it specializes in making some really cool vector graphics. You know, logos, drafts, general art. Did you know that all Adobe products can be scripted using AppleScript, VBScript, and JavaScript? Today, we’ll take advantage of very simple JavaScript statements in order to beautify our data. Our example data for this post comes from the aforementioned Fitbit API. Belen and I both ran two half-marathons this year: the San Diego Half, the La Jolla Half, and the Rock ‘n’ Roll Half. Yes, there’s three halves here, that’s because we ran two separately and one together! While I’m very proud of our accomplishments, there’s a goldmine of data from our Fitbits just waiting to be visualized. Each Fitbit activity contains time, distance, location, heart-rate data and more. First things first, because the races started at different dates and different times, we should standardize our time variable (clock) to be time since the first gun start. gen time = clock - clock[_n-1] replace time = sum(time) duplicates drop time, force
We do this for both datasets, we’ll call them WM and BC. We’ll also preface all variables with the prefix WM or BC before we merge the data. This can easily be accomplished by the command:
ren * WM*
ren WMtime time
Now we can merge the WM set on the BC set and standardize.
collapse (max) WM* BC* time, by(Time) line WMelevation BCelevation Time 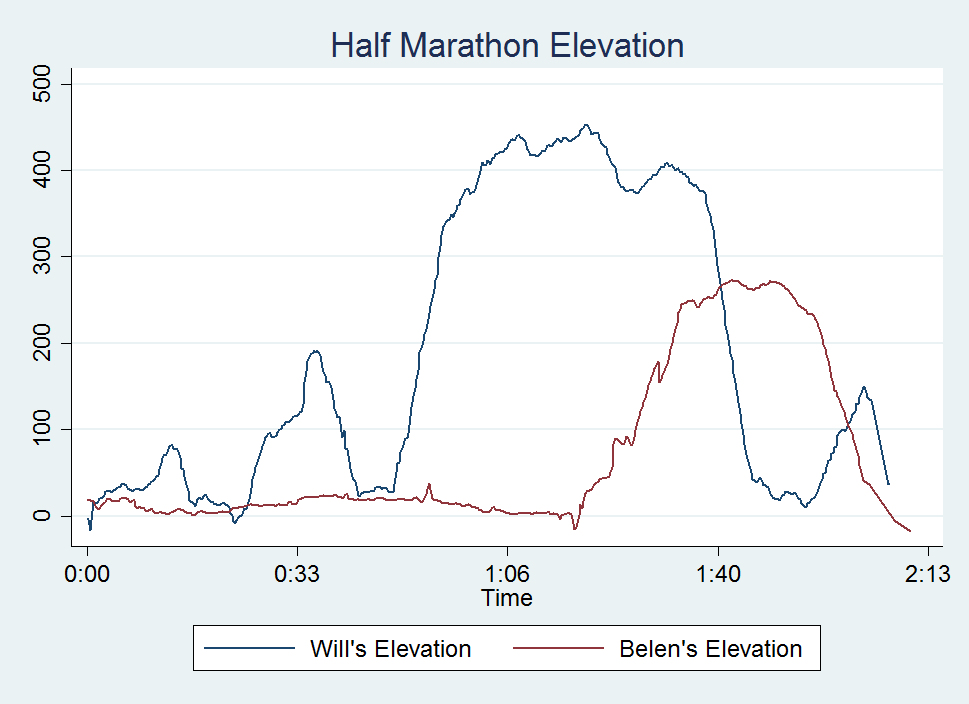
Look at that, a perfect 2D representation of our halves on the same axis. The x-axis measures distance and time to completion whereas the y-axis shows the elevation at that time. A steeper slope shows a very quick climb. This is my one issue with this type of graph, it doesn’t show just how grueling the La Jolla Half once you enter Torrey Pines National Park, but what doesn’t kill you makes you stronger.
Now, if you know about Adobe products but haven’t used any scripting yet, you’re in for a treat! With Adobe CC you can easily download the Adobe ExtendScript Toolkit IDE from the Creative Cloud, and this will allow us to do all of our scripting. Unfortunately, many of you might know of easier ways to do what we’re going to accomplish in the next step so I have to mention this is merely for informative purposes that serves to remove the roadblock of knowing how to integrate Stata with Adobe products. Back to the tutorial, let’s take this path for instance: 
It has four anchor points at some set of coordinates in our drawing space. The coordinates usually take the form (x,y) so we can think of our path as an array of four coordinates. Let’s look how we might start creating this path in JavaScript:
var doc = app.activeDocument;
var stataPath = new Array(4);
Here, we set up our document as a variable as well as the path we’re going to create. Notice, the path is going to be an array with four elements. We start coding the elements as such (remember JavaScript lists initialize at 0): stataPath[0] = new Array(78 , 317); stataPath [1] = new Array(258 , 133); stataPath [2] = new Array(537, 330); stataPath [3] = new Array(828 , 154); Finally, we just have to add the following lines to have it actually draw our shape! app.defaultStroked = true; newPath = app.activeDocument.pathItems.add(); newPath.setEntirePath(stataPath); And that’s essentially it! I usually have Stata write the data I need to these arrays and enjoy how easy it is to create artful representations of our otherwise technical graphs. One quick note, you should probably transform your data so that it fits in the dimensions of your Illustrator file (or you can scale it later). Writing our script is extremely simple with the use of –filefilter – and loops.
tempfile f1
file open myfile using `f1', write replace
forvalues i = 1/`=_N' {
        file write myfile " stataPath [`=`i'-1'] = new Array( `=Time[`i']' , `=`init'[`i']');" _n
}
file close myfile
view `f1'
Once you run your script, the math stuff is over and it is time to make art! Happy drawing. In an unrelated note, the second reason for the lack of posts is because Belen has recently moved from San Diego and I wanted to take a moment to thank and acknowledge her for her contributions to wmatsuoka.com. She’s been my unofficial editor and a great soundboard for what ideas are too stupid to make the cut for the Stata blog. While it is always sad to see someone go, I wish her all the best in her new endeavors. Good luck, Belen! And here’s the final result of our blog: be forewarned that I am not claiming to be an artist.

OAuthWhy Care Block:
Oh man, things are about to get real juicy – this is the final reveal of the Twitter API and I couldn’t think of a better time to do this. After all, we’ve made a complete mess out of Stata with our unruly bitwise operators, unending computer security algorithms, and un-um… unfortunate time-based C-plugins. Well, my Stata friends, this is how to do anything with Stata and the Twitter API.
Let’s post! Seriously, let’s tweet about things using Stata. This method can be used not only to tweet, but also to send direct messages, retweet things, and like (favorite) others’ tweets. If you’re like me, you don’t really use Twitter that well and I’m sure my 40 followers (I rounded up) would agree. But wouldn’t it be great to find a way to reach thousands of Twitter followers based off of hashtags or messages or even emoji? If the answer is no, fine, that’s my best attempt at convincing you but still feel free to read on. Let’s bring together everything we need to send a Tweet out on the internet:
Base64 Encoding
Easy way to turn readable stuff into unreadable stuff for humans but it’s not so bad for computers. This takes all alphanumeric characters plus the plus and the “/” (which equals 64 characters to choose from), converts 8-bit chunks into 6-bit chunks which end up receiving the specific character. Sometimes equal signs are added, but you already know that.
See post on Base64 Encoding Bitwise Operators and Security Methods
We’ve got bits dressed to the nines: shifting operators, rotating operators, logical operators, overflow methods, and all kinds of methods to translate from base 2 to base 16 to base 10.
These feed into our HMAC-SHA1 algorithm, which was awful to develop… this seriously has to go in the “lots of effort, little reward” category. See post on Bitwise Operators and HMAC-SHA1 Stata Plugins
We needed time - I mean we all do – in seconds since 1970 based off of Greenwich Time. We could have just accounted for our respective time zones (unless you’re located in GMT+0 of course), but why not use this as a great learning opportunity?
See post on Plugins Nonce
Once? None? Scone? What’s a nonce? Simply put, it’s a random 32 character word containing all alphanumeric symbols. Twitter’s example shows this being Base64 encoded, but all it has to be is a random string. vqib2ve89dOnTusESAS26Ceu9TcUES2i – see? Easy, just make sure you change the characters each time.
Percent Encoding
What%27s%20percent%20encoding%3F
Based on the UTF-8 URL Encoding standards, we need to replace certain characters that would otherwise cause complications in a URL. Don’t worry though, we’ve got a function for that. Just know that valid URL characters are all letters and numbers as well as the dash, the period, the underscore, and the tilde.
Send Out the Tweets
Twitter has some fabulous documentation for their API so it’s fairly easy to find the method that you want to do. These processes can be generalized and used across many of these methods so we are by no means limited to just tweeting. For tweets (hereon referred to as status updates to be consistent with Twitter’s documentation), we use the base or “resource” URL:
https://api.twitter.com/1.1/statuses/update.json Remember, status updates can only be 140 characters and Twitter will actually shorten URLs for you, but still keep in mind your character limits! All statuses must be percent encoded, so let’s go ahead and create our status local; we’ll also store our base URL while we’re at it.
local b_url "https://api.twitter.com/1.1/statuses/update.json"
local status = "Sent out this tweet using #Stata and the #Twitter #API – http://www.wmatsuoka.com/stata/stata-and-the-twitter-api-part-ii tells you how!"
mata: st_local("status", percentencode("`status'"))
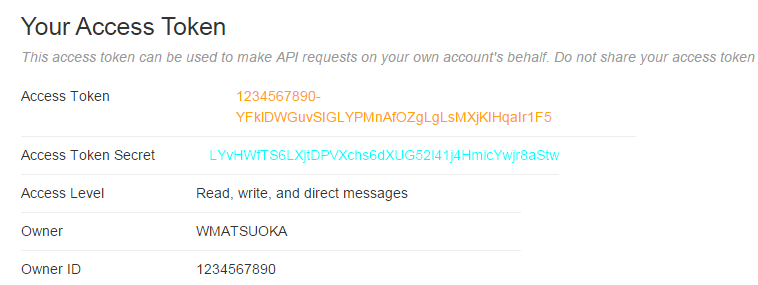
We then take all of our application information: consumer key, consumer secret, access token, and access secret and store these as locals as well. local cons_key "ZAPp9dO37PnzCofN2Nm8n8kye" local cons_sec "kfbtARFpBIdb515iaS48kYZjWhLoIdbEiAINDVX0c3W3e0fgWe" local accs_key "1234567890-YFklDWGuvSIGLYPMnAfOZgLgLsMXjKIHqaIr1F5" local accs_sec "LYvHWfTS6LXjtDPVXchs6dXUG52l41j4HmicYwjr8aStw" For this section, we will be creating all of our necessary authentication variables. The first step to creating our secret signing key is to make a string that contains our consumer secret key, concatenated with an ampersand, concatenated with our access secret key. We’ll also include all the necessary locals we talked about earlier.
local s_key = "`cons_sec'&`accs_sec'"
mata: st_local("nonce", gen_nonce_32())
local sig_meth = "HMAC-SHA1"
// If you don't make a plugin, just make sure you do seconds since 1970
// probably using c(current_date) and c(current_time) - [your time zone]
plugin call st_utm
local ts = (clock(substr("`utm_time'", 4, .), "MDhmsY") - clock("1970", "Y"))/1000
Now it’s time to create our signature. We start by percent encoding our base URL. For our signature string, we include the following categories:
local sig = "oauth_consumer_key=`cons_key'&oauth_nonce=`nonce'&oauth_signature_method=`sig_meth'&oauth_timestamp=`ts'&oauth_token=`accs_tok'&oauth_version=1.0&status=`status'" Then, percent encode the signature string and base URL:
mata: st_local("pe", percentencode("`b_url'"))
mata: st_local("pe_sig", percentencode("`sig'"))
This next step is why we spent an ungodly amount of time on bits and hashes! We need to transform our signature string into a Base64 encoding of the HMAC-SHA1 hash result with our message being the percent-encoded signature base hashed with our secret key. Sorry if that's a mouthful, but we can see what that translates to below.
local sig_base = "POST&`pe'&"
mata: x=sha1toascii(hmac_sha1("`s_key'", "`sig_base'`pe_sig'"))
mata: st_local("sig", percentencode(encode64(x)))
Finally, we’re almost done with Twitter and can move on to other more important things! First let’s make sure to post our Tweet because, after all, that's what we're here for. !curl -k --request "POST" "`b_url'" --data "status=`status'" --header "Authorization: OAuth oauth_consumer_key="`cons_key'", oauth_nonce="`nonce'", oauth_signature="`sig'", oauth_signature_method="`sig_meth'", oauth_timestamp="`ts'", oauth_token="`accs_tok'", oauth_version="1.0"" --verbose Now we can marvel at how much time we spent learning about something 99% of us don’t really care about. This is for you, 1% - this is all for you.
PS: Want to add emoji? Go to this site, find the URL Escape Code sections, and add the result to your status string! Ex: %F0%9F%93%88 = Chart with Upward Trend Application-Only AuthenticationWhy Care Block:
This is it – the culmination of all of our hard work and it’s broken up into two posts. The first (this one) shows us how to get Twitter data, and the second shows us how to post things on Twitter using Stata and our API library.
This post is brought to you thanks to an openness and willingness to share information. In today’s day and age, it’s ridiculous to try and hide information or impede the transfer of knowledge to others. I recently experienced first-hand the negative result openness can have on those who wish to obfuscate information. I guess these certain individuals are incapable of adapting, sharing, and participating in the global community – perhaps it’s not their fault if they feel threatened, but this does not excuse what I believe to be an original sin when it comes to technology. Sure it’s difficult to produce new things and sometimes even more difficult to scrap projects you’re emotionally attached to, but to abandon creativity and sequester change is the antithesis of this post. I’m sure many of you have dealt with an issue similar to this in your line of work, please don’t give up the good fight. If this sounds familiar, well this post is dedicated to you. Just like the last Fitbit API post, all corresponding variables are color-coded for your convenience. The first thing we need to do is set up an application with the Twitter API. Once you enter all the necessary information, go to the “Keys and Access Tokens” tag to get your Consumer Key and Consumer Secret. FYI, all information provided below is fake, sorry to disappoint. 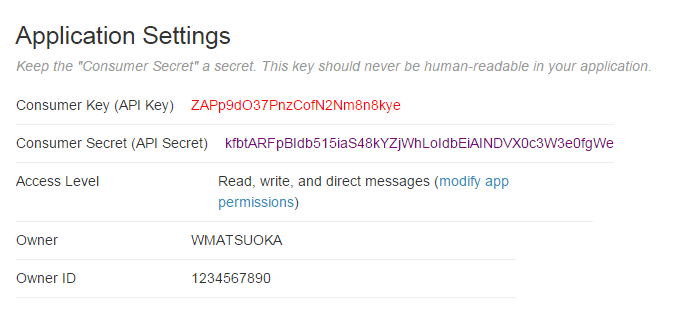
Below the Application Settings section is the “Your Access Token” section which contains the Access Token and Access Token Secret which we will use to get our basic tweet data and search for other interesting things.
Just like our Fitbit API, we need to first get an Authorization Token by sending a cURL request that takes the Base64 encoded consumer key and client secret. First let’s set up our variables:
local cons_key "ZAPp9dO37PnzCofN2Nm8n8kye"
local cons_sec "kfbtARFpBIdb515iaS48kYZjWhLoIdbEiAINDVX0c3W3e0fgWe"
local accs_key "1234567890-YFklDWGuvSIGLYPMnAfOZgLgLsMXjKIHqaIr1F5"
local accs_sec "LYvHWfTS6LXjtDPVXchs6dXUG52l41j4HmicYwjr8aStw"
Note: we will not be using the access key or secret until the next post
And create our encoded consumer information string (recall encode64 is available through this post): encode64 "`cons_key':`cons_sec'" local client64 = r(base64) Now we simply send our request to Twitter: !curl -k -i -H "Content-Type: application/x-www-form-urlencoded" -H "Authorization: Basic `client64'" --request POST --data "grant_type=client_credentials" https://api.twitter.com/oauth2/token --output "token.json" Be sure to parse the access token from our outputted token.json file (perhaps this would be a good place to enter error handling methods), I stored the value in the global macro $token. Finally, send one more request that contains the query you’re looking for: !curl -k -i -H "Authorization: Bearer $token" --request GET "https://api.twitter.com/1.1/statuses/user_timeline.json?count=100&screen_name=_belenchavez" --output "output.json" In this case, we were able to pull the top 100 things from @_belenchavez’s timeline using the statuses API. For more information about what you can do with the application only authentication, check our Twitter’s documentation here. Otherwise, take a look at this frequency cloud of my commonly Tweeted/Re-Tweeted hashtags of 2016 thanks to wordclouds.com. It even looks somewhat like the Twitter logo! 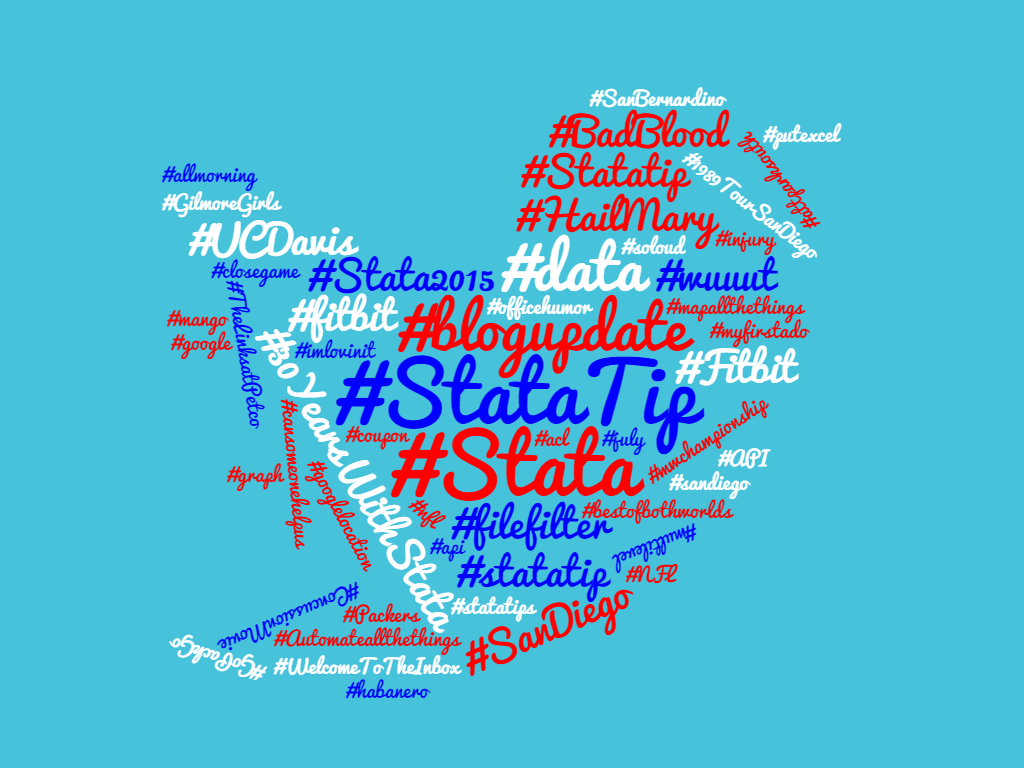
I thought I’d take a quick break from the latest series on building the Twitter API Library to bring you a message sponsored by Stata Plugins! Okay, we’re not officially sponsored by Stata and, legally speaking, we’re not sponsored by anyone. Technicalities. Maybe someday you’ll wish to plug your brand [here], but even I think that’s highly unlikely – so let’s just get right to plugins.
Do you know C? I wouldn’t say I know it very well, but that sure as hell shouldn’t stop us – this is a great learning opportunity! If you know the language, please feel free to skip to the next paragraph. Still here? Excellent! That means you’re like me and aren’t too concerned with lower level programming languages (that’s code for a language that’s a lot more explicit – it doesn’t look like English anymore). After all, a statement such as: regress price mpg
is much easier to understand than this great (albeit extremely technical) Stata Blog post showing us what’s actually going on behind the scenes so to speak. Now, I actually have some training in Java, but honestly I have to tribute my smooth transition into C to Mata. Mata is a wonderful extension to Stata and I highly recommend picking it up if you haven’t already. It can be difficult to transition to Mata if you simply use Stata and there seems to be a lack of literature pertaining to learning Mata. I’ll point you to UCLA’s code fragment on Mata or Bill Gould’s Mata Matters/Mata the Missing Manual resources if you wish to learn more. The observation is: Mata prepares you for C because it’s extremely similar to the C language and a great transitional language from Stata to C. What’s the point though, right? Well, Mata enables you to be quicker and do complicated things directly from your do-file. Learning C, while sometimes unnecessary if your job is strictly to do quick analysis, will make it so that you can blow your colleagues away by showing them how your new program reduced the return time of a command from .8 to .6 seconds. Sorry again colleagues.
Troubleshooting is difficult and I hope to have a video available soon, but not today. So what’s a practical application for plugins? Directly related to the Twitter API posts, we need Stata to provide us with the time. “That’s dumb” you’d say. Just use - c(current_time) -. Fine, but now we need time in UTC which by the way is combination of the acronyms Coordinate Universal Time (CUT) and the French Temps Universel Coordonné (TUC). So how about:
clock(c(current_time) , "hms") – (TimeOffsetfromGMT)*60*60*1000 Close! But we’re also extremely lazy and want the computer to figure out which time zone we’re in (regardless of whether we have internet connection or not) and it needs to work in batch mode! Okay okay, enough with the requests! Basically, the question is how can we take the computer’s internal UTC time information? That’s where Stata plugins come in handy. At a high level, what we’re going to do is tell Stata: “Hey Stata, go ahead and talk to the computer. Ask it what the current UTC time is and place the result in a local macro that we can call later. Thanks!” Because I have a 64-bit system, it seems that the simple things tend to get a little complicated. I compile the file in Visual Studio (x64) and I also have the 64-bit version of Stata installed. Here’s the main file st_utc.c which should be compiled with the two necessary Stata files stplugin.c and stplugin.h. In other words, it worked for me but unfortunately I give no guarantees that it will work seamlessly on your end. Please edit as necessary. 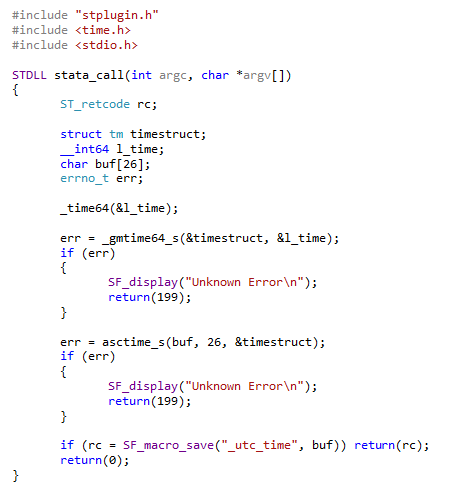
So what’s going on here? Well, the beauty of this file is that we can load whatever libraries we need – here we included the time library so that we can access time variables directly from our stata_call routine. Note how we declare our error handling variable to be of type ST_retcode. We are able to call SF_display which prints the contents of a variable or string to the Stata console and SF_macro_save which allows us to access the contents of the variable buf (our time string) directly from the Stata local `utc_time’ thanks to the stplugin.h header.
After compiling st_utc.dll, you can either rename it st_utc.plugin and place it in your personal ado directory for easy access, or keep it as a dll and specify the location of the file using the option using() as shown below: program st_utc, plugin using(st_utc.dll) plugin call st_utc And it’s that easy! Or so it seems. There are a lot of technical errors that you have to keep in mind from operating systems, to Stata versions (look to older plugin interface versions with older versions of Stata), to whether you really want to spend the time debugging your compiled code. It’s well worth getting it to work at least once! The important take away here is that any Stata user can greatly extend the capabilities of Stata; we haven’t even talked about javacall yet. So the next time a non-Stata user tries to assert their software package dominance by saying: “oh, Stata couldn’t do “x” so I had to use some otheR package”, bet them $20 they’re wrong. Most of the time, they don’t know what they’re talking about and you’ll have $20 to spend on some sweet Stata swag (seriously, we’re not sponsored by Stata). Why Care Block?
I applaud all of you who have made it this far, but unfortunately things are going to get super boring! Well, besides applause I’d also like to take a sentence to thank you for reading this content: whether you’re reading this out of boredom, coercion, to make fun of it, or you just have a general interest, I’d like to extend my gratitude.
Switching back to the good stuff, today we’re talking about hash functions. Think hash browns *delicious* - they’re sliced, diced, and fried to a golden brown; drenched or drizzled with hot sauce or ketchup (I prefer Cholula and Tabasco) and resembles nothing like the raw potato it once was. Now, take your hash browns and try to reconstruct the original potato. “No!” you’d say, “That’s really hard.” Keep in mind this post is about security, from a non-cryptographic scientist or security expert, so anticipate a lot more potato metaphors because that’s about all I know about security. This post is really about making the Twitter API work within Stata without any outside plugins or packages. To do so, we must find a way to recreate the HMAC-SHA1 algorithm which is quite difficult without our previous toolset we designed, so make sure you’ve gone over the bitwise operators. Once we’re on the same page, we can start getting into this hash function in order to send requests using Twitter’s API so that you can retrieve you beautiful, crispy hash brown data in return. The Fuss
HMAC-SHA1 is the type of procedure we’re trying to reproduce from the Wikipedia article available here. I didn’t care much for it. It didn’t explain what it is, what it was really doing, or why we should care at a simple level so that someone less savvy (like me) could understand just what the fuss is all about. Both HMAC and SHA1 are procedures. HMAC stands for Hash Message Authentication Code and is the procedure we use to combine a message with a secret key whereas SHA-1 stands for Security Hash Algorithm 1, which was made by the NSA and is used to break a message into a corresponding hash string with a fixed block size. Together, they make sure that the integrity of the data hasn’t been compromised and that you’re not sending your raw secret message over the internet…series of tubes. The nice thing about the SHA-1 algorithm is that very slight changes, say replacing a single character in the message, dramatically changes the resulting hash so that it’s difficult to crack (though apparently not secure enough for today’s standards). Remember, HMAC is the main procedure to combine a secret key with the message and SHA-1 is just the type of hash function implemented; but you probably don’t care that much and just want to see the code. So let’s get started!
The SHA-1
SHA-1 has a lot of destructive procedures, a lot of breaking bits into smaller bits, and a lot of the previously developed bitwise functions. Let’s see a quick example of this in action.
Say I have the string phrase "The Ore-Ida brand is a syllabic abbreviation of Oregon and Idaho" and I want to run the SHA-1 Function on it.
mata: sha1("The Ore-Ida brand is a syllabic abbreviation of Oregon and Idaho")
The results is (hex): 156a5e19b6301e43794afc5e5aff0584e25bfbe7
In Base64: FWpeGbYwHkN5SvxeWv8FhOJb++c=
Good luck figuring out the original string from the Base64 encoding. Now remember, this is not a post about theory or reasoning behind the SHA-1 procedure; this post is about making it work. Therefore, the advanced Stata user who wishes to replicate/improve this code might find this next section interesting. Here are some of my observations regarding repackaging the SHA-1 function. 
The HMAC
Compared to SHA-1, the HMAC procedure is a walk in the potato fields… it’s easy as potatoes… I’m running out of references here. Did you know that the potato was the first vegetable to be grown in space? If astronauts could do that with potatoes, we can certainly make HMAC-SHA1 work with Stata. There’s really just a three step process at play. The HMAC procedure takes two inputs: a key and a message.
The Conclusion
Well, this post (and the previous one) has been filled with a little more technical jargon than I planned. I like to keep these posts fun and poignant, but this material is for the dedicated and serves as a reference for those who want to expand Stata’s capabilities (even if it takes a little longer than expected). This new Mata function allows Stata to perform the HMAC-SHA1 procedure which is vital for enabling Twitter requests through Stata so that the entire process can be contained within one do-file. Here’s an example of the function in action:
. mata: hmac_sha1("Secret Key", "Message to be sent")
  d5052c13e868ea7c932be9279752e9e67c8195bd
. mata: hmac_sha1("Secret Key", "Message to be Sent")
  f67f5f90132583de85abf0d61fed2a2144be1f04
You can see how the examples show that slight changes in the message dramatically change the output. Feel free to download the process below. All subroutines are included for your convenience. Good luck!
Bitwise Operators (aka Bits, Bits, Bits Part II)
Did you know that Mata supports bitwise operators? Well, it actually doesn't – in the typical sense. But that won't stop us from making it work. You see, Mata can handle data extremely well, and with a little finesse, can be forced to do things it wasn't really made to do. Yes it's going to be slow, and yes it's probably not very useful to the average user, but let me try to convince you how great using Mata really is!
For those who don't know, Mata is a lower level language than Stata – many of Stata's complex functions are actually written in Mata because it's really quite fast. Mata mimics a lot of C's syntax, but also simplifies things so you don't feel like you have to explicitly declare everything. In previous posts we've exploited the power of the - inbase() - function and we will make ample use of that today. Say we have a text file containing the word "Chunk". While we see a word, the computer sees numbers which correspond to each letter – otherwise known as ASCII. Mata's - ascii() - function can help us find this representation: 
This is a simple way of converting our text into numbers, but how about into bytes? Typically, bytes are displayed in base 16:

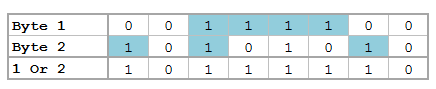
But now we want to see each bit. Remember, I'm not a computer scientist, so you can trust me when I say this really isn't all that bad for those of you who haven't been exposed to this stuff. Just know that each of these bytes contains 8 bits. Each bit can either be on or off (1 or 0) which means that there’s a total possible bit combination of 2^8 = 256 per byte. Let's look at what Stata shows us when we look at everything in base 2:

Notice, I added a zero and a one at the end of the text string "chunk" for illustrative purposes. Why are these values not 0 and 1 respectively? That’s because the digits are also ASCII characters (digits 48 and 49). We can get the values of zero and one by using the - char() - function. For fun, we'll also look at values two and three as well.

Well, because there are technically 8 bits per byte, we need to pad each output with zeros so that the total length is 8 bits. For example: the value "3" can be written as "11" in base 2, but is the same "00000011" so that we can imagine all 8 bits. We can easily accomplish this in matrix form.

Notice the use of the colon operator? It's by far one of my favorite operands (not that I have that many) because it does the same operation on each element of the matrix, which makes the overall statement extremely succinct! The statement above just says: "Give me some zeros, exactly 8 minus how every many numbers we had, and append the original statement to the end to make sure every element has exactly 8 digits."
We should probably make this into a function, since we’ll use it a lot. So let's make the size of the padding an input as well.
mata:
string matrix padbit(string matrix x, real scalar padnum)
{
        string matrix y
        y = "0" :* (padnum :- strlen(x)) :+ x
        return (y)
}
end
mata: padbit(chunk, 8)
|
|||||||||||||||||


| bitwise-mata-functions.do |
Shifts and Rotations
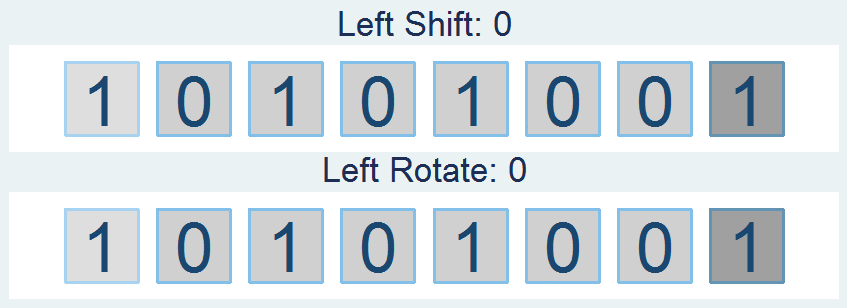
It's interesting to follow, though not all that interesting if it doesn't have a practical application. If you're like "honestly, I don’t know nothing about bit functions", I'll say - well I've got the one you. How about a way to easily encrypt your files so that you can hide your sensitive stuff in plain sight? First find a file and read it in:
// Read in File to Copy
fh  = fopen("Building an API Library.docx", "r")
eof = _fseek(fh, 0, 1)
fseek(fh, 0, -1)
x = fread(fh, eof)
fclose(fh)
Convert the file characters to the ASCII decimal value then convert this number into the base 2 representation (don't forget to pad the bits). From here, we can use our bitwise operations before converting this number back to base 10 and finally back to characters:
// Run Bitwise Not
y = padbit(inbase(2, ascii(x)), 8)
for (i=1; i<=cols(y); i++) {
        y[i] = bitnot(y[i])
}
y = char(frombase(2, y))
Lastly, write your newly altered file using Mata. This is obviously very basic, but a great way to hamper nosy coworkers.
// Write the Results to File
fh = fopen("Copy.docx", "w")
fwrite(fh, y)
fclose(fh)
But really, we're doing this with the ultimate goal of gaining access to Twitter data using Twitter's API. This is just step one of a three part series and if you're lost so far. there's plenty of time to see the motivation for this post in the next step. I promise it gets more interesting, yet I hope I've shown some of Mata's potential and how you can easily bring in the concepts to your own do-files.
The Fitbit API and OAuth 2.0
Why Care Block:
OAuth 2.0 is in use for most API's, from Fitbit toFacebook, Instagram to Twitter.
cURL works seamlessly with Stata's syntax and allows for sending HTTP requests – in English, we can take advantage of a lot of good resources.
Setting It Up
I think it's safe to say that people are fascinated by themselves and their day-to-day biology that usually goes unnoticed. The trend of wearable technology seems to be thriving and shows little sign of a slowdown. Fitbit, in particular, has exploded in popularity as one can be seen sported by President Obama on the latest episode of Comedians in Cars Getting Coffee. Now I have to mention that I don’t think I’d have this interest if it were not for Belen, first for introducing me to the Fitbit and second for being such great competition in our respective daily step goal challenges.
While Fitbit does an excellent job at providing a great amount of data available to your fingertips, heart rate data has been particularly elusive. Why? Well, it's probably what people are most interested in when buying the Charge HR and could be used in conjunction with step count to paint a pretty accurate picture of the wearer's habits – hence it's only available using their API. The following provides a mid-level description of how we go about getting access to our own data. Let's start with registering an Application, you can read more about it at https://dev.fitbit.com/docs.
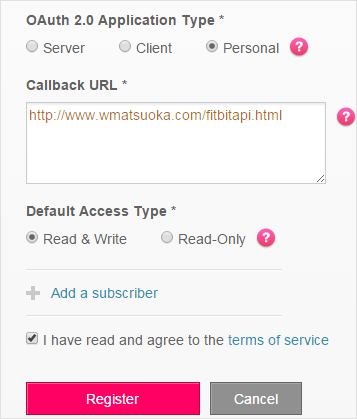
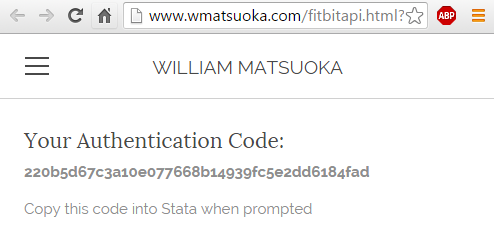
Enter all your personal information, but pay special attention to the sections above. If you want Heart Rate data, you must select the "Personal" box under OAuth2.0 Application Type*. You may wish to give your application Read and Write privileges as well if it's your own personal application. Finally, you can use the Callback URL http://www.wmatsuoka.com/fitbitapi.html or you can use any other site. It's just the redirection site after authentication, more on this in the next section.
First Stage: Code
Find your application's client_id and client_secret by going to "MANAGE MY APPS". Click on your App and you'll see the following information:
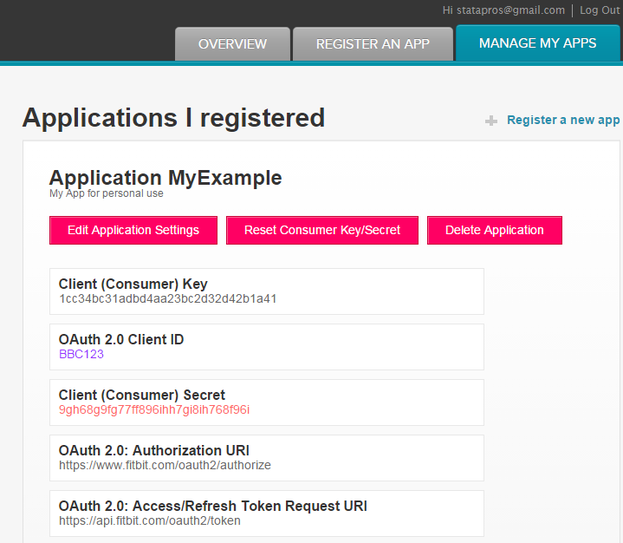
local client_id "BBC123"
local client_secret "9gh68g9fg77ff896ihh7gi8ih768f96i"
local redirect "http%3A%2F%2Fwww.wmatsuoka.com%2Ffitbitapi.html"
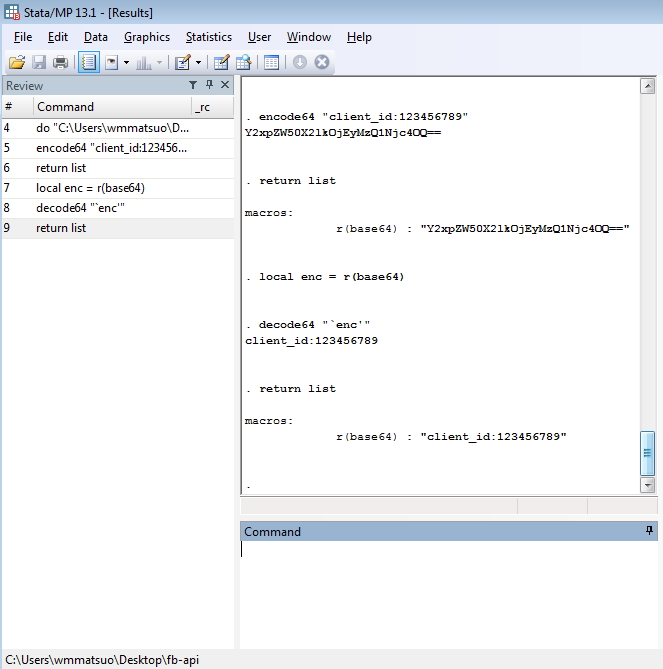
encode64 "`client_id':`client_secret'"
local client64 = r(base64)
// This can be ran straight from a browser
local url = "https://www.fitbit.com/oauth2/authorize" ///
+ "?response_type=code&client_id=`client_id'" ///
+ "&redirect_uri=`redirect'" ///
+ "&scope=activity%20nutrition%20heartrate%20location%20" ///
+ "nutrition%20profile%20settings%20sleep%20social%20weight"
view browse "`url'"
http://www.google.com?code=abcdefghijklmnopqrstuvwxyz916
Second Stage: Authorization
First, we need to know a little bit about the shell command. Shell (which can also be called by typing "!") allows you to send operating system commands from Stata, the advantage of the shell command is that it will wait until the command has finished before resuming the Stata do-file. Alternatively, there's the command winexec – it operates like shell, with the exception that Stata won’t wait for it to complete before moving on to the next do-file command.
In order to pass the code back to Stata after viewing the code in your browser, I like to use the display directive _request(). It halts your code and allows you to enter a value before continuing, storing the value in a global macro.
display "Please wait for browser "                                  ///
    "and enter the code from the redirect URL" _request(code)
if ("$code" == "") exit

local d_client "client_id=`client_id'"
local d_auth   "grant_type=authorization_code"

!curl -i -H "Content-Type: application/x-www-form-urlencoded"       ///
    -H "Authorization: Basic `client64'" --request POST --data      ///
    "`d_client'&`d_auth'&redirect_uri=`redirect'&code=$code"        ///
    https://api.fitbit.com/oauth2/token                             ///
    --output "accesstoken.json"
This asks for your access token, which is necessary to make any request to Fitbit and places the result in the file "accesstoken.json". You can see that it uses your client_id, the Base64 encoded local made in the previous stage, and the code that you entered from the browser. You may change the output file name, but the information contained should be the following:
Response from server:
{
 "access_token" : "eyJhbGciOiJIUzI1NiJ9.eyJleHAiOjE0NTE4MDAyNjksInNjb3BlcyI6Indsb2Mgd3BybyB3bnV0IHdzZXQgd3NsZSB3aHIgd3dlaSB3YWN0IHdzb2MiLCJzdWIiOiIzSzdQVzYiLCJhdWQiOiIyMjlZRFciLCJpc3MiOiJGaXRiaXQiLCJ0eXAiOiJhY2Nlc3NfdG9rZW4iLCJpYXQiOjE0NTE3OTY2Njl9.nO9nHAM2daPPvAMd6wIJgAc7B4KKRXFP6X8Jawy-l8s",
 "expires_in" : "3600",
 "refresh_token" : "4fe7f608a98644205161d85f91f7e3034d8cf463d89f1dd7e89f84b096a2f0ff",
 "scope" : "nutrition sleep settings social weight activity heartrate profile location",
 "token_type" : "Bearer",
 "user_id" : "WMM999"
}
You may parse this file how ever you wish, just make sure to take the access_token and, optionally, the user_id (you can just memorize this value and hardcode it into your requests if the application is only for your personal use). The token lasts for an hour, so you may use it to call multiple requests within the Fitbit's call limit which happens to be 150 requests per hour.
Third Stage: Requests
global uid    = "WMM999"
local d       = "2015-12-31"
local fburl   = "https://api.fitbit.com"
local request = "`fburl'/1/user/\$uid/activities/heart/date/`d'/1d/1sec.json"
local output  = "output_file.json"

winexec curl -i -H "Authorization: Bearer $access_token" ///
        --request GET "`request'" --output "`output'"
For a full list of requests, check out Fitbit's website. Otherwise, try practicing this method with other APIs - you'll be surprised by what you find!
Why Care Block:
Base64 encoding is extremely common when using API services, such as the Fitbit API, but that’s about all I know. It’s necessary to get the job done and isn’t readily available in Stata.
Base64 encoding exists for some privacy purpose. That's about all I want to say about Base64 encoding. Let's just look at an example, they’re a lot cooler.
Say for instance we have the phrase: “This is kinda boring…”
By converting every character to ASCII bytes (and by potentially adding padding), converting each byte to base 2, taking the 8-bit representation of the binary character and convert it to a six bits, converting that back to base 10, and using those numbers (they fall between 0 and 63) to look up the corresponding character of the alphabet plus two other characters, we finally arrive at the following encoded string:
"VGhpcyBpcyBraW5kYSBib3JpbmcuLi4="
While they mean the same thing, I think the first phrase was a little more accurate. We can encode this second phrase a second time and it gives us:
"VkdocGN5QnBjeUJyYVc1a1lTQmliM0pwYm1jdUxpND0="
Now you can easily send encoded messages to your friend (not plural – I can't imagine that many people would tolerate this type of behavior). I’ve put together a Stata package containing these routines; however, no help file is available upon the first release. Here is a brief overview of the new commands, encode64 and decode64 at work.
| encode64.ado |
For Use with Windows
A quick Google search yields many answers – most of which requires you to know a thing or two about email servers. After hours of collecting material and trying to send out emails, you'll realize that your work's firewall disallows you to do anything of the sort! Well, if you use Outlook (which is pretty common), you can easily automate sending emails using the following VBScript:
Set Outlook = CreateObject("Outlook.Application")
Set Mail = Outlook.CreateItem(0)
Mail.To = "[email protected]"
Mail.Subject = "Automated Email"
Mail.Body = "Hello Recipient"
Mail.Send
Set Mail = Nothing
Set Outlook = Nothing
But how do we send this out? It's really quite simple. Open up any text editor (though I recommend using Notepad++), copy this code into the text editor, and save this file as "whatever.vbs", and either double click the file or run it by using Stata's shell command.
yourdirectory + "whatever.vbs"
CRLF
Anyway, this combination is useful to you if you want to send multiple paragraphs in an email. Even more useful, write out your email body in a text file and let Stata pick up the file for you, and write the body by itself. But more on that in a little bit. For now, let’s talk about writing the actual script.
In Stata, in order to write a script, we must first familiarize ourselves with the file processing commands: file open, file write, and file close. The secret here is that we can use locals to fill out any missing information in the file such as an email recipient, a subject line, or an attachment location. Boom! We have a program.
program define outlook_email
        syntax , to(string) [subject(string) body(string) attachment(string)]
end
Since we always need a recipient for an email "to" is a must, but everything else should remain optional. We want to allow our users to do whatever they want, which might include sending out 10,000 blank emails to a specific person. Why? They probably have their reasons.
File Processing
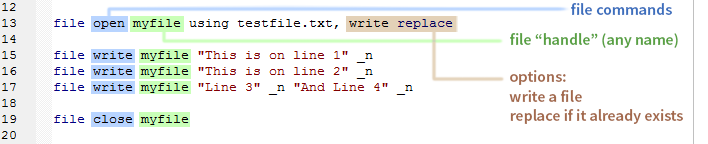
Notice that we just need to put a string followed by _n to write a single line to the file. We then do that again for line two, and for lines three and four. We're able to write lines three and four on the same line, because they contain that _n which calls for an end of line character (in this case CRLF) to be written.
The Body
- Get rid of quotes: from " to "+Chr(34)+"
- Get rid of apostrophes: from ' to "+Chr(39)+"
- Replace CRL characters: from \013d\010d to "+ Chr(13)+Chr(10)+"
- Get rid of useless stuff: from +""+ to +
Final Program
********************************************************************************
* Will Matsuoka: 2015-12-17 version 2.0.0 - for demonstrative purposes
********************************************************************************

program define outlook_email
        syntax , to(string) [subject(string) body(string) attachment(string)]

* Allow for the subject to contain quotes and apostrophes
        if `"`subject'"' != "" {
                sta_2_vbs `"`subject'"'
                local subject = r(vbstring)
        }

        if `"`body'"' != "" {
                preserve
                tempfile f1 f2
                filefilter "`body'" `f1', from(`"""') to(`""+Chr(34)+""')
                filefilter `f1' `f2', from(`"'"') to(`""+Chr(39)+""')
                filefilter `f2' `f1', from(\013d\010d) to(`""+Chr(13)+Chr(10)+""') replace
                filefilter `f1' `f2', from(`"+""+"') to("+") replace

                clear
                set obs 1
                gen file = fileread("`f2'")
                local body = file[1]
                restore
        }

        tempname myfile
        file open `myfile' using sendemail.vbs, write replace
        file write `myfile' ///
                `"Set Outlook = CreateObject("Outlook.Application")"' _n ///
                `"Set Mail = Outlook.CreateItem(0)"' _n ///
                `"Mail.To = "`to'""' _n ///
                `"Mail.Subject = "`subject'""' _n ///
                `"Mail.Body = "`body'""' _n
        if "`attachment'" != "" {
                file write `myfile' `"Mail.Attachments.Add("`attachment'")"' _n
        }
        file write `myfile' ///
                `"Mail.Send"' _n ///
                `"Set Mail = Nothing"' _n ///
                `"Set Outlook = Nothing"' _n
        file close `myfile'

        shell sendemail.vbs
end

program define sta_2_vbs, rclass
        local string = subinstr(`"`1'"', `"""', `""+Chr(34)+""', .)
        local string = subinstr(`"`string'"', `"'"', `""+Chr(39)+""', .)
        local string = subinstr(`"`string'"', `"+""+"', "+", .)
        return local vbstring `"`string'"'
end
Not too terrible, although I do have a few things to note:
- For troubleshooting, if your VBScript works, your Stata script should work - in other words, start at your VBScript
- There are times where it helps to keep Outlook open, to make sure that your email doesn't just sit in the outbox
- If you're trying to run this in batch mode, omit the shell command. Just call the script on the next line of your batch file (since shell doesn't work in batch mode)
Author
Will Matsuoka is the creator of W=M/Stata - he likes creativity and simplicity, taking pictures of food, competition, and anything that can be analyzed.
For more information about this site, check out the teaser above!
Archives
July 2016
June 2016
March 2016
February 2016
January 2016
December 2015
November 2015
October 2015
September 2015
Categories
All
3ds Max
Adobe
API
Base16
Base2
Base64
Binary
Bitmap
Color
Crawldir
Email
Encryption
Excel
Exif
File
Fileread
Filewrite
Fitbit
Formulas
Gcmap
GIMP
GIS
Google
History
JavaScript
Location
Maps
Mata
Music
NFL
Numtobase26
Parsing
Pictures
Plugins
Privacy
Putexcel
Summary
Taylor Swift
Twitter
Vbscript
Work
Xlsx
XML
 RSS Feed